Spring Boot: The Ultimate Guide (2023)

This is the most comprehensive tutorial on the Spring Boot framework online.

In this spring boot tutorial, you will learn how to use the most popular Java framework, Spring Boot. You will learn Spring Boot from scratch to an advanced level.

Also, how to install Java and set up the Spring Boot server on your local machine.

Spring Boot: The Ultimate Guide (2023)

Chapter 1: Complete Overview of Spring Boot

In this tutorial, you will learn how to use the most popular Java framework, Spring Boot.

This tutorial will teach you how to build a web application using Spring Boot from scratch. You will also learn how to install Java and set up the Spring Boot server on your local machine.

Also, you will learn how to connect a PostgreSQL database with Spring Boot and build and deploy a full-blown application to the server in this Spring Boot tutorial.

Let’s dive right in:

Prerequisites

Before continuing with this tutorial, you will need to have an understanding of:

  • Server-side web programming,

  • Frameworks,

  • General Knowledge of Java

This will aid your understanding of the Spring Boot framework.

What is Spring Boot?

Spring Boot is an open-source Java framework designed to simplify the development of Java-based web applications. It is built on top of the popular Spring framework and provides a convention-over-configuration approach, which allows developers to quickly create production-ready applications with little effort.

The primary goal of Spring Boot is to remove boilerplate code and complex configurations that developers often encounter when building web applications with the Spring framework. It comes with a set of opinionated defaults and auto-configuration capabilities, which reduces the time and effort needed to set up a Spring web application.

Features of Spring Boot

Spring Boot is loaded with several key features that make it a popular choice for web development in Java. Here are some of its key features:

features of spring boot

Easy Configuration:

Spring Boot automatically configures various components based on the dependencies present in the classpath. It removes the need for explicit configuration and reduces the development time required to set up a web application.

Starter Dependencies:

Spring Boot provides a wide range of "starter" dependencies. These are pre-configured dependency bundles. These starters simplify dependency management by providing a set of dependencies for specific functionalities such as data access, security, testing, etc.

Embedded Servers:

Spring Boot comes with embedded web servers like Tomcat, Jetty, Netty, and Undertow. These servers allow developers to run their application as a standalone JAR or WAR file, without the need to deploy to an external server. It simplifies the deployment process and makes it seamless to distribute and run Spring Boot applications.

Spring Boot Actuator:

Spring Boot Actuator comes with a feature for monitoring your application. It exposes a set of endpoints that allows developers to gather metrics, monitor health status, view logs, perform thread dumps, and much more. Spring Boot actuator simplifies the operational aspects of your application and enables the efficient monitoring of your application in production.

Developer Tool:

Spring Boot provides a range of developer-friendly tools that enhance productivity during development. It comes with features like automatic application restarts, live reloading of changes, enhanced debugging support, and more. This tool helps to streamline a developer’s workflow and further reduces the time taken for code changes to reflect in the running application.

Why You Should Learn Spring Boot

Why you should learn spring boot

Career Opportunities

Picking up Spring Boot can open up new career opportunities for you. Many companies are looking for developers who have experience with Spring Boot and are willing to pay a premium for those skills. By learning Spring Boot, you differentiate yourself from other developers and position yourself for better job opportunities with good remuneration.

Fast Development

Spring Boot provides a fast and seamless way to build bespoke projects with minimal setup, allowing you to focus on writing business logic rather than boilerplate code.

Rich Ecosystem

Spring Boot is an extension or subset of the Spring framework, which has a large ecosystem of libraries for building robust and scalable web applications. This ecosystem comes with popular libraries such as Spring Web, Spring Data, Spring Webflux, Spring Security, and Spring Cloud, among others.

Community Support

Be rest assured that when you get stuck while building a web application, Spring Boot has a large and active community, they’ll provide you with resources, guides, tutorials, and support to help you learn and troubleshoot any issues you may encounter while building with Spring Boot.

Spring Boot vs Other Java Web Frameworks

Comparing Spring Boot with other Java web frameworks shows that Spring Boot is one of the top Java frameworks with a total of 67.9k GitHub Stars, while others like Vert.x 13.6k GitHub Stars, Quarkus 11.9k GitHub Stars, Struts 1.2k GitHub Stars.

A screenshot of Github Stars

What makes Spring Boot have these high GitHub stars, it is not far-fetched, Spring Boot comes with the following out of the box.

  • Flexible, type-safe, and externalized configuration

  • Loose coupling (due to dependency injection)

  • Easy-to-test applications (due to dependency injection)

  • Uses POJOs (Plain Old Java Objects)

  • Extensive documentation

  • Active community

Now that you have a holistic overview of Spring Boot. Let’s dive right into the framework itself and explore its inner workings.

Chapter 2: Spring Boot The Framework

In this chapter, we will explore a little about the Spring Boot framework. We will discuss the structure and architecture of the Spring Boot framework and the Spring Boot workflow architecture.

Spring Boot uses the hierarchical architecture where each of the layers is stacked on top of each other and communicate is also in the same fashion.

Spring Boot Architecture

Now let’s explore the main layers and architecture of Spring Boot to understand the inner working of the framework. The layers a divided into 4 main categories:

  1. Presentation Layer

  2. Business Layer

  3. Persistence Layer

  4. Database Layer

Nevertheless, soon you will discover that the business layer is the most important layer for a backend engineer as it is where all the logic of your application is written. Now let's explore each of these layers and learn what function they provide.

Spring boot Architecture

Presentation Layer

The presentation layer is what the user sees from the outside or what is exposed to the outside world. It can be a JSON structure that is made up of viewpoints. It can be split into the front layer which is what is seen from the outside and a back layer which is where the structure is built from viewpoints. The back layer also interprets JSON and handles authentication and HTTP requests before entering into the business layer.

Business Layer

The business layer houses all the logic that is specific to the application under development. It interacts with both the presentational layer and the persistence to perform its responsibilities.

It is responsible for performing validations, performing authorization, and handling business logic and rules and it consists of service classes.

Persistence Layer

The persistence layer is responsible for all the storage logic including databases and any other form of data persistence. It is responsible for containing storage logic, Fetching objects, and translating them into database rows (and vice versa).

This layer is the equivalent of the Repository interface and database queries are written inside this interface. The Persistence layer is the only layer that communicates with the Business layer and the Database layer.

Database Layer

The database layer contains all the databases such as MySQL, MongoDB, Postgres, etc as the name suggests. It is responsible for performing database operations (mainly CRUD operations) and it is the actual database that you decide to use to build your application.

Understanding the internal structures and architecture of Spring Boot is crucial to understand how you use Spring Boot to the fullest. Now that we have explored the hierarchical architecture of Spring Boot. Let’s explore the workflow of the framework.

Spring Boot Workflow

There’s no doubt that Spring Boot relies heavily on the Spring framework, which means that it integrates almost all of the features and modules of Spring such as Spring MVC, Spring Core, etc.

Therefore, the Spring Boot framework is structured using the popular MVC (Model, View, Controller) pattern that is slightly modified.

Spring Boot Workflow

Here is a theoretical example of the workflow of Spring Boot from Request to Response:

  1. First, the Client makes an HTTP request using GET, PUT, POST, etc.

  2. The Controller class receives the HTTP request.

  3. The Controller understands what type of request will process, and then it deals with it.

  4. If it is needed, it calls the Service class.

  5. The Service Class is going to handle the business logic. It does this on the data from the database.

  6. If everything goes well, it returns a response as a JSP page.

If you’re familiar with the MVC architecture, you can easily spot the Model, View, and Controller components used all around the workflow with the addition of Service Class, etc which makes up a modified MVC pattern (introduction of Service classes).

Modified MVC Architecture

When you are building a Spring Boot Web API project, typically, you will want your code to be maintainable, modular, and have a separation of concerns. Therefore, the 4 main layers above are further broken down into different smaller components which make up the modified MVC pattern used in Spring Boot.

Below are some of the components that make up the Spring Boot framework and you will encounter these components always as you continue to work with the framework.

  1. Controllers: Controllers handle incoming HTTP requests and return the appropriate responses. It receives requests from clients, invokes validations and business logic using Services, and returns the response to the client. Controller classes are usually annotated with @RestController or @Controller annotations and also have methods that are annotated with request mapping annotations like @RequestMapping, @GetMapping, @PostMapping, and so on.

  2. Services: Services house the business logic of your application. This is where you write all the complex business rules, and coordinate data access, and transformation operations. They process data, perform validations, apply business rules, and invoke data access operations through repositories or DAOs(Data Access Objects). The service class is an abstraction layer between the controller and the data access layer.

  3. Data Access: Data Access interacts with the underlying data storage systems, such as databases or external Web APIs. It carries out CRUD (Create, Read, Update, Delete) operations on data. It consists of repositories or DAOs (Data Access Objects) that provide an abstraction for database operations. Spring Boot provides support for data access and manipulation through libraries like Spring Data JPA.

  4. Models: Models contain the entities or domain objects that represent the data and the relationships between them. These domain objects are mapped to database tables. Models provide a definition for the structure and behavior of the data used in the application. It may also include DTOs (Data Transfer Objects) and/or View Models for transferring data between layers or to external clients.

  5. Exception Handling: Exception handling deals with capturing and handling exceptions that occur during the execution of the API. It provides a mechanism to catch exceptions, transform them into meaningful error responses, and return them to the client. Spring Boot offers various exception-handling techniques, such as using @ExceptionHandler annotations or implementing custom exception handlers.

  6. Configurations: Configurations contain configuration files and classes required for setting up the Spring Boot web API. It contains properties files (application.properties or application.yml) which are used for configuring various aspects of the application, as well as custom configuration classes that define beans, security settings, or other application-specific configurations.

Now that we understand the inner workings of the Spring Boot Framework, let’s start building our first project following the structure from this tutorial

Chapter 3: Building A Web App with Spring Boot

What better way to learn than to understand the theoretical and practical parts of a technical topic? Here are the steps you should take to create a Spring Boot web API.

Set Up Your Development Environment

Before you begin, make sure you have the following installed on your system:

  • Java Development Kit (JDK) 20 or later

  • An IDE of your choice (e.g., IntelliJ IDEA, Eclipse)

Generate a Spring Boot Project with Spring Initializr

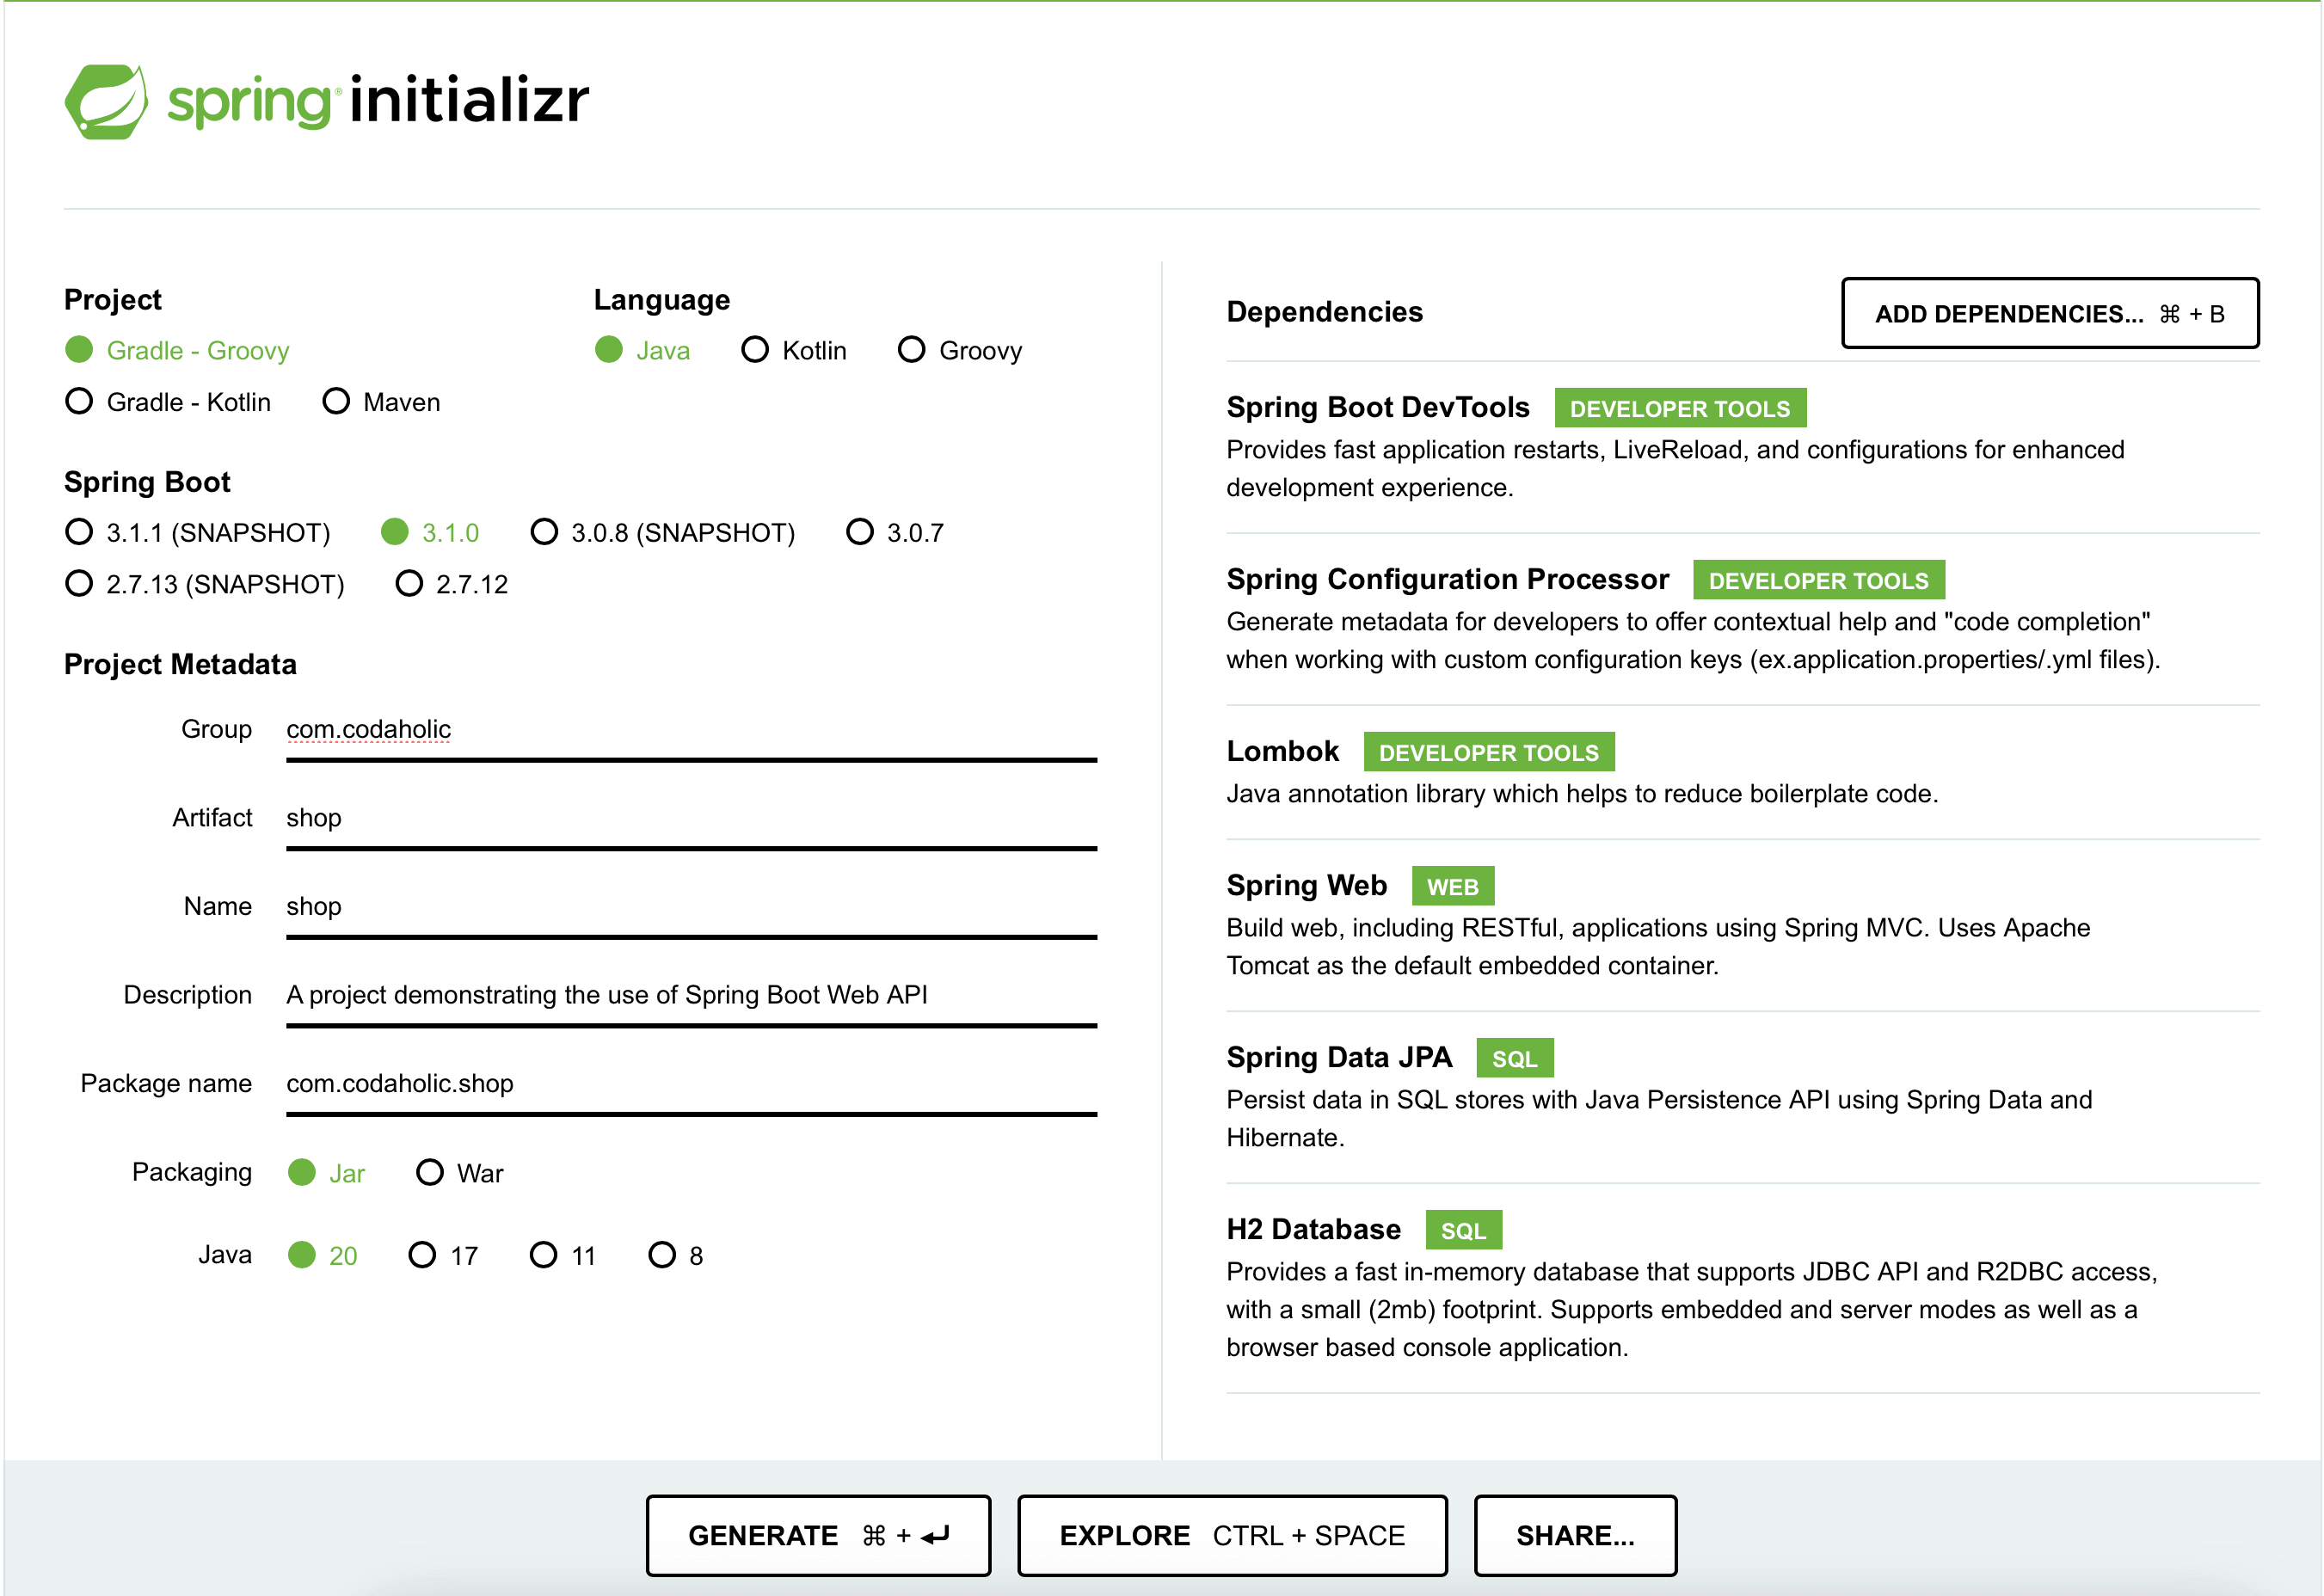
Spring Initializr is a web-based tool that helps you quickly bootstrap Spring Boot projects. Follow these steps to quickly generate one:

  1. Open your web browser and go to https://start.spring.io/.

  2. Select the following options:

    • Project: Gradle Project

    • Language: Java

    • Spring Boot: Choose the desired version (e.g., 3.1.0)

    • Group: com.codaholic (replace with your desired package name)

    • Artifact: shop (replace with your desired project name)

    • Packaging: Jar

    • Java: Choose the desired version (17)

    • Dependencies: Select the following: Spring Web, Lombok, H2 Database, Spring Boot Data JPA, Spring Boot DevTools, and Spring Boot Configuration Processor

  3. Click on the "Generate" button to download the project as a ZIP file.

a screenshot of spring intializer

Import the Project into Your IDE

  • Unzip the downloaded ZIP file to a directory of your choice.

  • Open your IDE and import the project as a Gradle project. If you are using IntelliJ IDEA, go to File -> New -> Project from Existing Sources and select the project's directory. Follow the instructions to complete the import process.

  • Update build.gradle: Open up build.gradle and ensure that sourceCompatibility and targetCompatibility are 17

java {
	sourceCompatibility = '17'
	targetCompatibility = '17'
	project.buildDir = 'target'
}
  • Next, we are going to open up gradle/wrapper/gradle-wrapper.properties and change the distributionUrl to what is shown below.

distributionUrl=https\\://services.gradle.org/distributions/gradle-8.1.1-bin.zip

Create A Product Model

  1. Open the generated project in your IDE.

  2. Create a directory for models src/main/java/com/codaholic/shop/models

  3. Create a new java class in the models directory and name it Product.java, and add the following piece of code

package com.codaholic.shop.models;

import jakarta.persistence.*;
import jakarta.validation.constraints.NotEmpty;
import lombok.*;

@Data
@Entity
@Builder
@NoArgsConstructor
@AllArgsConstructor
@Table(name = "product")
@EqualsAndHashCode(callSuper = false)
public class Product {
    @Id
    @GeneratedValue(strategy = GenerationType.IDENTITY)
    private long Id;

    @NotEmpty(message = "Name cannot be blank")
    @Column(unique = true)
    private String name;

    private long quantity;
    private double unitPrice;
}

Let me explain what the piece of code above is doing

package com.codaholic.shop.models;

This line shows the package to which the Product class belongs. Packages are used to group related classes together.

The @Entity annotation indicates that this class represents a persistent entity in the database. It is typically used with JPA to map the class to a database table.

The @Data and @EqualsAndHashCode annotations are provided by Lombok, a library that reduces boilerplate code. @Data generates getters, setters, toString(), and equals() and hashCode() methods. @EqualsAndHashCode(callSuper = false) tells Lombok to generate equals() and hashCode() methods based only on the fields in this class and not in any superclass.

@Builder is another Lombok annotation that generates a builder pattern for the class, allowing the convenient creation of instances.

@NoArgsConstructor and @AllArgsConstructor are Lombok annotations that generate constructors with no arguments and constructors with all arguments, respectively.

@Table(name = "product") specifies the name of the database table associated with this entity. In this case, the table name is "product".

@Id indicates that the id field is the primary key of the entity.

@GeneratedValue(strategy = GenerationType.IDENTITY): It's a JPA annotation that defines the strategy for generating the primary key values. In this case, the IDENTITY strategy indicates that the primary key values will be automatically generated by the database.

If you don’t add this annotation, the id field will not be incremented by the database, hence, when you want to insert another record you’ll be greeted with a unique key constraint.

@NotEmpty checks if a value is not null and not empty.

The private access modifier restricts direct access to these fields, and the appropriate getter and setter methods will be generated by Lombok's @Data annotation.

  • name: Represents the name of the product.

  • quantity: Represents the quantity of the product.

  • unitPrice: Represents the unit price of the product.

Create A ProductRepository

  1. Create a directory for repositories src/main/java/com/codaholic/shop/repository

  2. Create a new Java class, `ProductRepository.java`, and add the following piece of code

package com.codaholic.shop.repository;

import com.codaholic.shop.models.Product;
import org.springframework.data.jpa.repository.JpaRepository;

public interface ProductRepository extends JpaRepository<Product, Long> {
}

The ProductRepository interface extends JpaRepository<Product, Long> What this means is that ProductRepository inherits the methods that are defined in JpaRepository specific to the Product entity.

The inherited `JpaRepository` interface contains methods such as save, findById, findAll, delete, etc., which are suited for carrying out common database operations on the Product entity.

The Long type argument represents the data type of the primary key of the Product entity.

Create A ProductService

  1. Create a directory for services src/main/java/com/codaholic/shop/services

  2. Create a new Java class in the directory you just created `ProductService.java`, and add the following piece of code

package com.codaholic.shop.services;

import com.codaholic.shop.models.Product;
import com.codaholic.shop.repository.ProductRepository;
import org.springframework.stereotype.Service;

import java.util.List;

@Service
public class ProductService {
    private final ProductRepository productRepository;

    ProductService(ProductRepository productRepository){
        this.productRepository = productRepository;
    }

    public List<Product> getAllProducts() {
        return productRepository.findAll();
    }

    public Product createProduct(Product product) {
        return productRepository.save(product);
    }

    public Product getProductById(Long id) {
        return productRepository.findById(id)
                .orElseThrow(() -> new IllegalArgumentException("Product not found"));
    }

    public Product updateProduct(Long id, Product productDetail) {
       Product product = productRepository.findById(id)
                .orElseThrow(() -> new IllegalArgumentException("Product not found"));

        product.setName(productDetail.getName());
        product.setQuantity(productDetail.getQuantity());
        product.setUnitPrice(productDetail.getUnitPrice());

        return productRepository.save(product);
    }

    public void deleteProduct(Long id) {
        productRepository.deleteById(id);
    }
}

Below is an explanation of what the piece of code above does

The following methods define the operations or actions that can be performed on products.

  • getAllProducts: Gets all products by calling `productRepository.findAll()`, which queries the database and comes back with a list of products.

  • createProduct: This adds a new product by calling productRepository.save() with the given product object, which saves the product to the database and comes back with the saved product.

  • getProductById: This fetches a specific product by its ID by calling productRepository.findById() with the given ID. If the product is found, it is returned. Else, it throws `IllegalArgumentException` a "Product not found" message.

  • updateProduct: This updates a specific product identified by its ID. What it does first is to get the existing product from the database using productRepository.findById(). If the said product is found, it will update its name and price with the details contained in the productDetail object. Finally, it saves the updated product using productRepository.save() and returns the updated product.

  • deleteProduct: This deletes a specific product identified by its ID by invoking the`productRepository.deleteById()`, which deletes the product from the database.

From the above, you can deduce that ProductService abstracts the business logic related to products and interacts with the ProductRepository data access operations. This allows for the separation of concerns, modularity, testability, and maintainability in the Spring Boot Web API architecture.

Create A ProductController

  1. Create a directory for controllers src/main/java/com/codaholic/shop/controllers

  2. Create a new Java class, ProductController.java, and add the following piece of code

package com.codaholic.shop.controllers;

import com.codaholic.shop.models.Product;
import com.codaholic.shop.services.ProductService;
import org.springframework.beans.factory.annotation.Autowired;
import org.springframework.http.HttpStatus;
import org.springframework.http.ResponseEntity;
import org.springframework.web.bind.annotation.*;

import java.util.List;

@RestController
@RequestMapping("/api/product")
public class ProductController {
    private final ProductService productService;

    @Autowired
    public ProductController(ProductService productService) {
        this.productService = productService;
    }

    @GetMapping
    public ResponseEntity<List<Product>> getAllProducts() {
        List<Product> products = productService.getAllProducts();
        return ResponseEntity.ok(products);
    }

    @PostMapping
    public ResponseEntity<Product> createProduct(@RequestBody Product product) {
        Product createdProduct = productService.createProduct(product);
        return ResponseEntity.status(HttpStatus.CREATED).body(createdProduct);
    }

    @GetMapping("/{id}")
    public ResponseEntity<Product> getProductById(@PathVariable Long id) {
        Product product = productService.getProductById(id);
        return ResponseEntity.ok(product);
    }

    @PutMapping("/{id}")
    public ResponseEntity<Product> updateProduct(@PathVariable Long id, @RequestBody Product productDetails) {
        Product updatedProduct = productService.updateProduct(id, productDetails);
        return ResponseEntity.ok(updatedProduct);
    }

    @DeleteMapping("/{id}")
    public ResponseEntity<Void> deleteProduct(@PathVariable Long id) {
        productService.deleteProduct(id);
        return ResponseEntity.noContent().build();
    }
}

Below is an explanation of what **ProductController** does:

Starting with the methods annotated with @GetMapping, @PostMapping, @PutMapping, and @DeleteMapping. These annotations specify the corresponding HTTP methods (GET, POST, PUT, DELETE) for the API endpoints.

  • getAllProducts: This method sends all the requests for getting all products to the productService.getAllProducts() and returns them in the response body.

  • createProduct: This method directs all requests for creating a new product by calling productService.createProduct() with the provided product object in the request body. It returns the created product in the response body with a status code of 201 (CREATED).

  • getProductById: This method directs all requests for getting a specific product by its ID by calling productService.getProductById() with the provided ID. It returns the product in the response body.

  • updateProduct: This method directs all requests for updating a specific product identified by its ID. It calls productService.updateProduct() with the provided ID and product details in the request body. It returns the updated product in the response body.

  • deleteProduct: This method directs all requests for deleting a specific product identified by its ID by calling productService.deleteProduct(). It returns a response with a status code of 204 (NO CONTENT), indicating a successful deletion with no response body.

From the piece of code above, you can see that the ProductController acts as a manager, they don’t contain any business logic, they just route the request to the corresponding methods in ProductService

Set up the H2 Database

For the purpose of demonstration, we will use a temporary database. Below is the configuration to set up the database.

  1. Rename application.properties in src/main/resources/ to application.yml

  2. Next, add the below Yaml configuration to src/main/resources/application.yml

spring:
    h2:
        console:
            enabled: true
    datasource:
        url: jdbc:h2:mem:testdb
        driverClassName: org.h2.Driver
    jpa:
        database-platform: org.hibernate.dialect.H2Dialect
        show-sql: true
        hibernate:
            ddl-auto: create-drop

server:
    port: 3000
    compression:
        enabled: true
    error:
        include-message: always
    shutdown: "graceful"

Build and Run the Application

  1. Open a terminal or command prompt.

  2. Navigate to the project's root directory.

  3. Run the following command to build the project:

./gradlew bootRun

The Spring Boot application will start, and you will see log messages showing that the server is up and running.

Let’s test our Spring Boot Web API

To test our API, we need to download and install a REST Client called Postman. A REST Client is an application that API developers use to test their Web APIs.

NB: You can use any REST Client of your choice, it must not be Postman

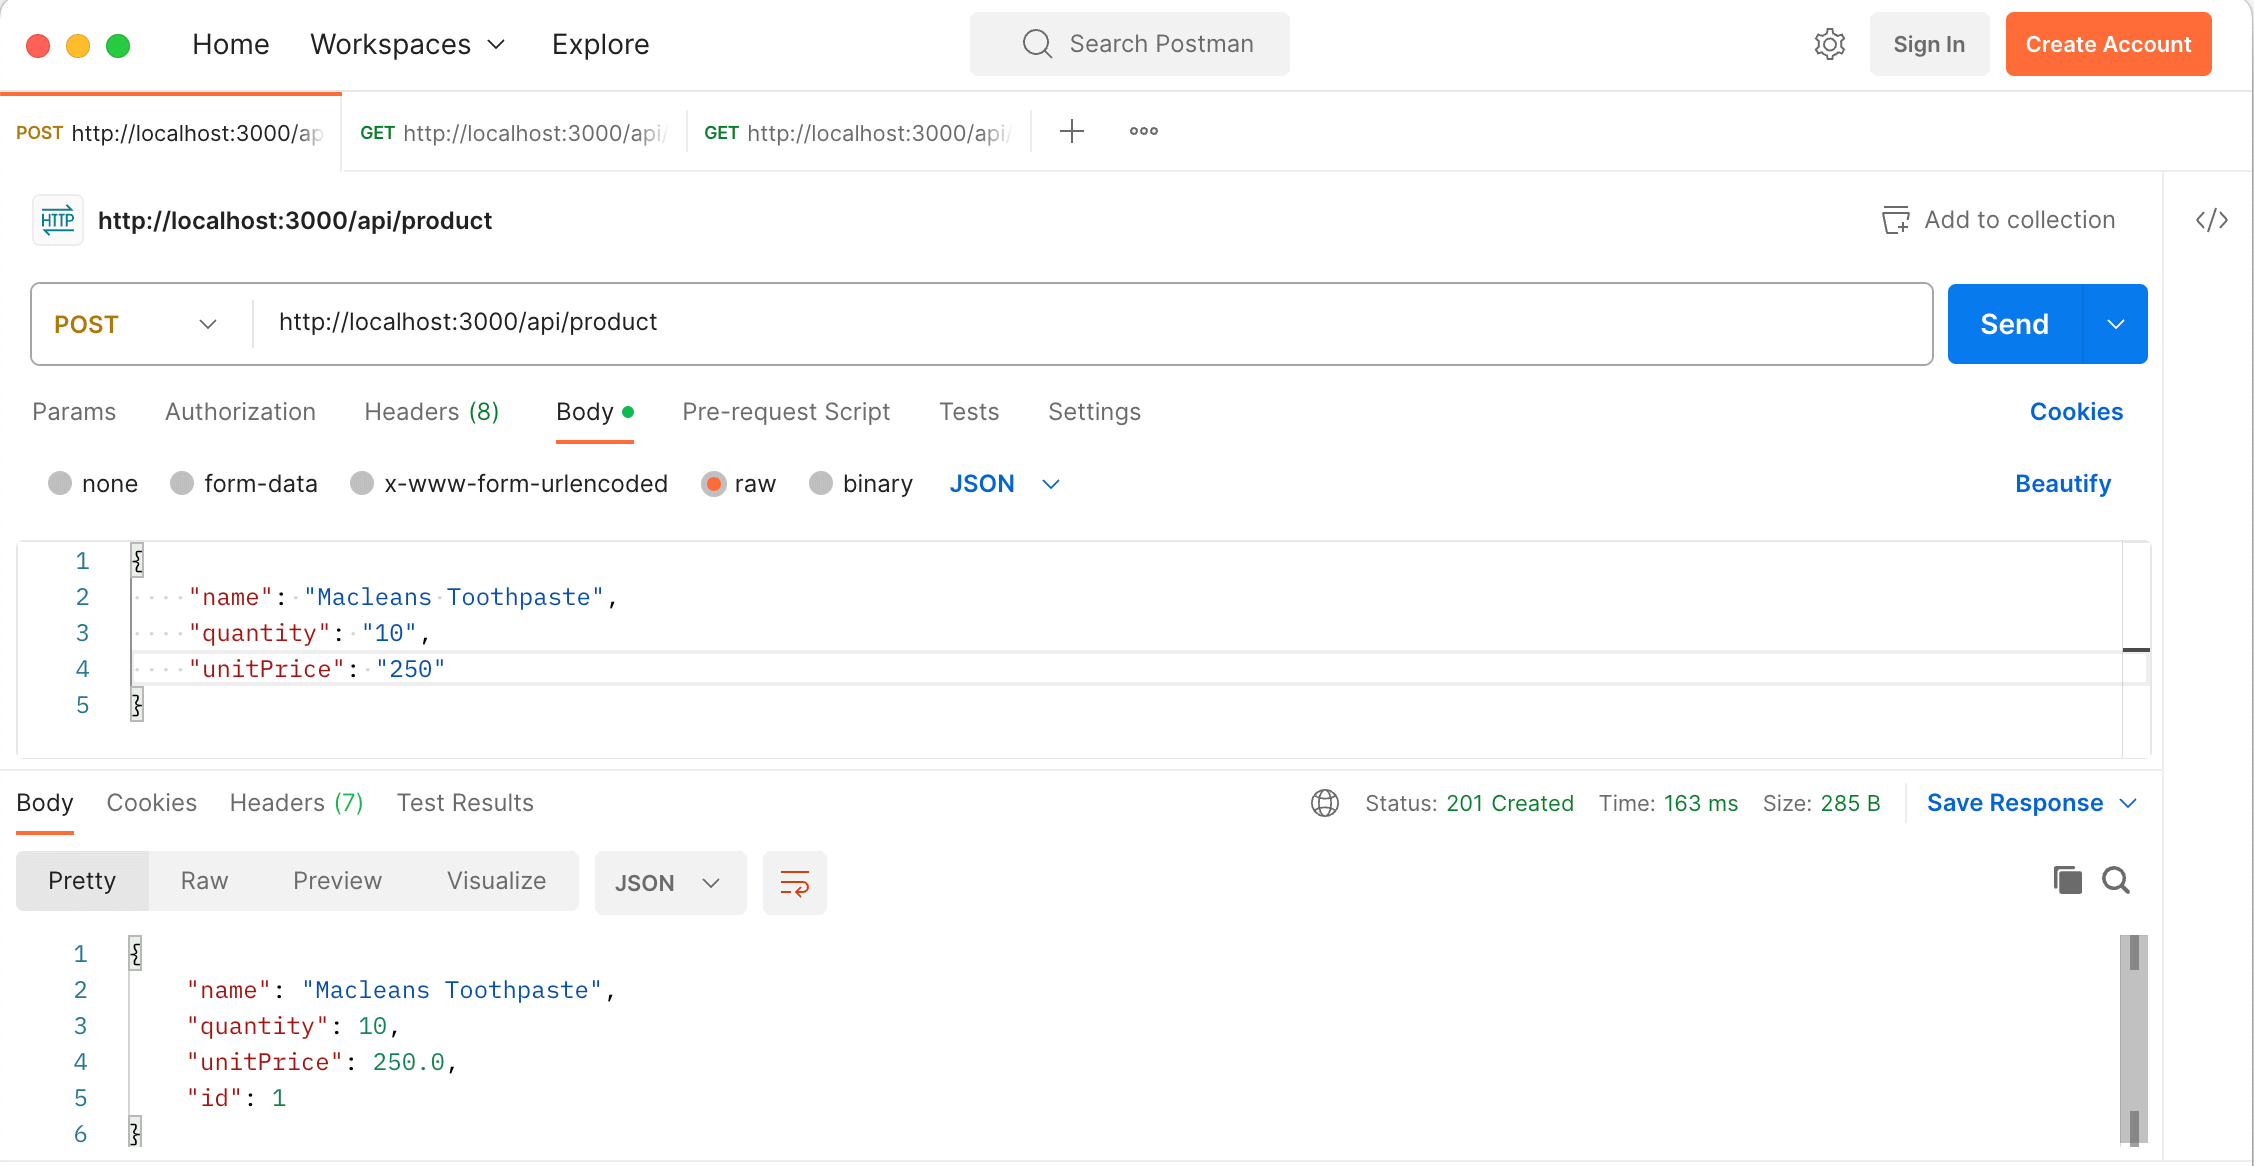
First, we need to create a resource, we need to add a product into our database. To do that we need to create a POST request to this endpoint http://localhost:3000/api/product in JSON format as shown in the image below.

a screenshot of spring boot postman result

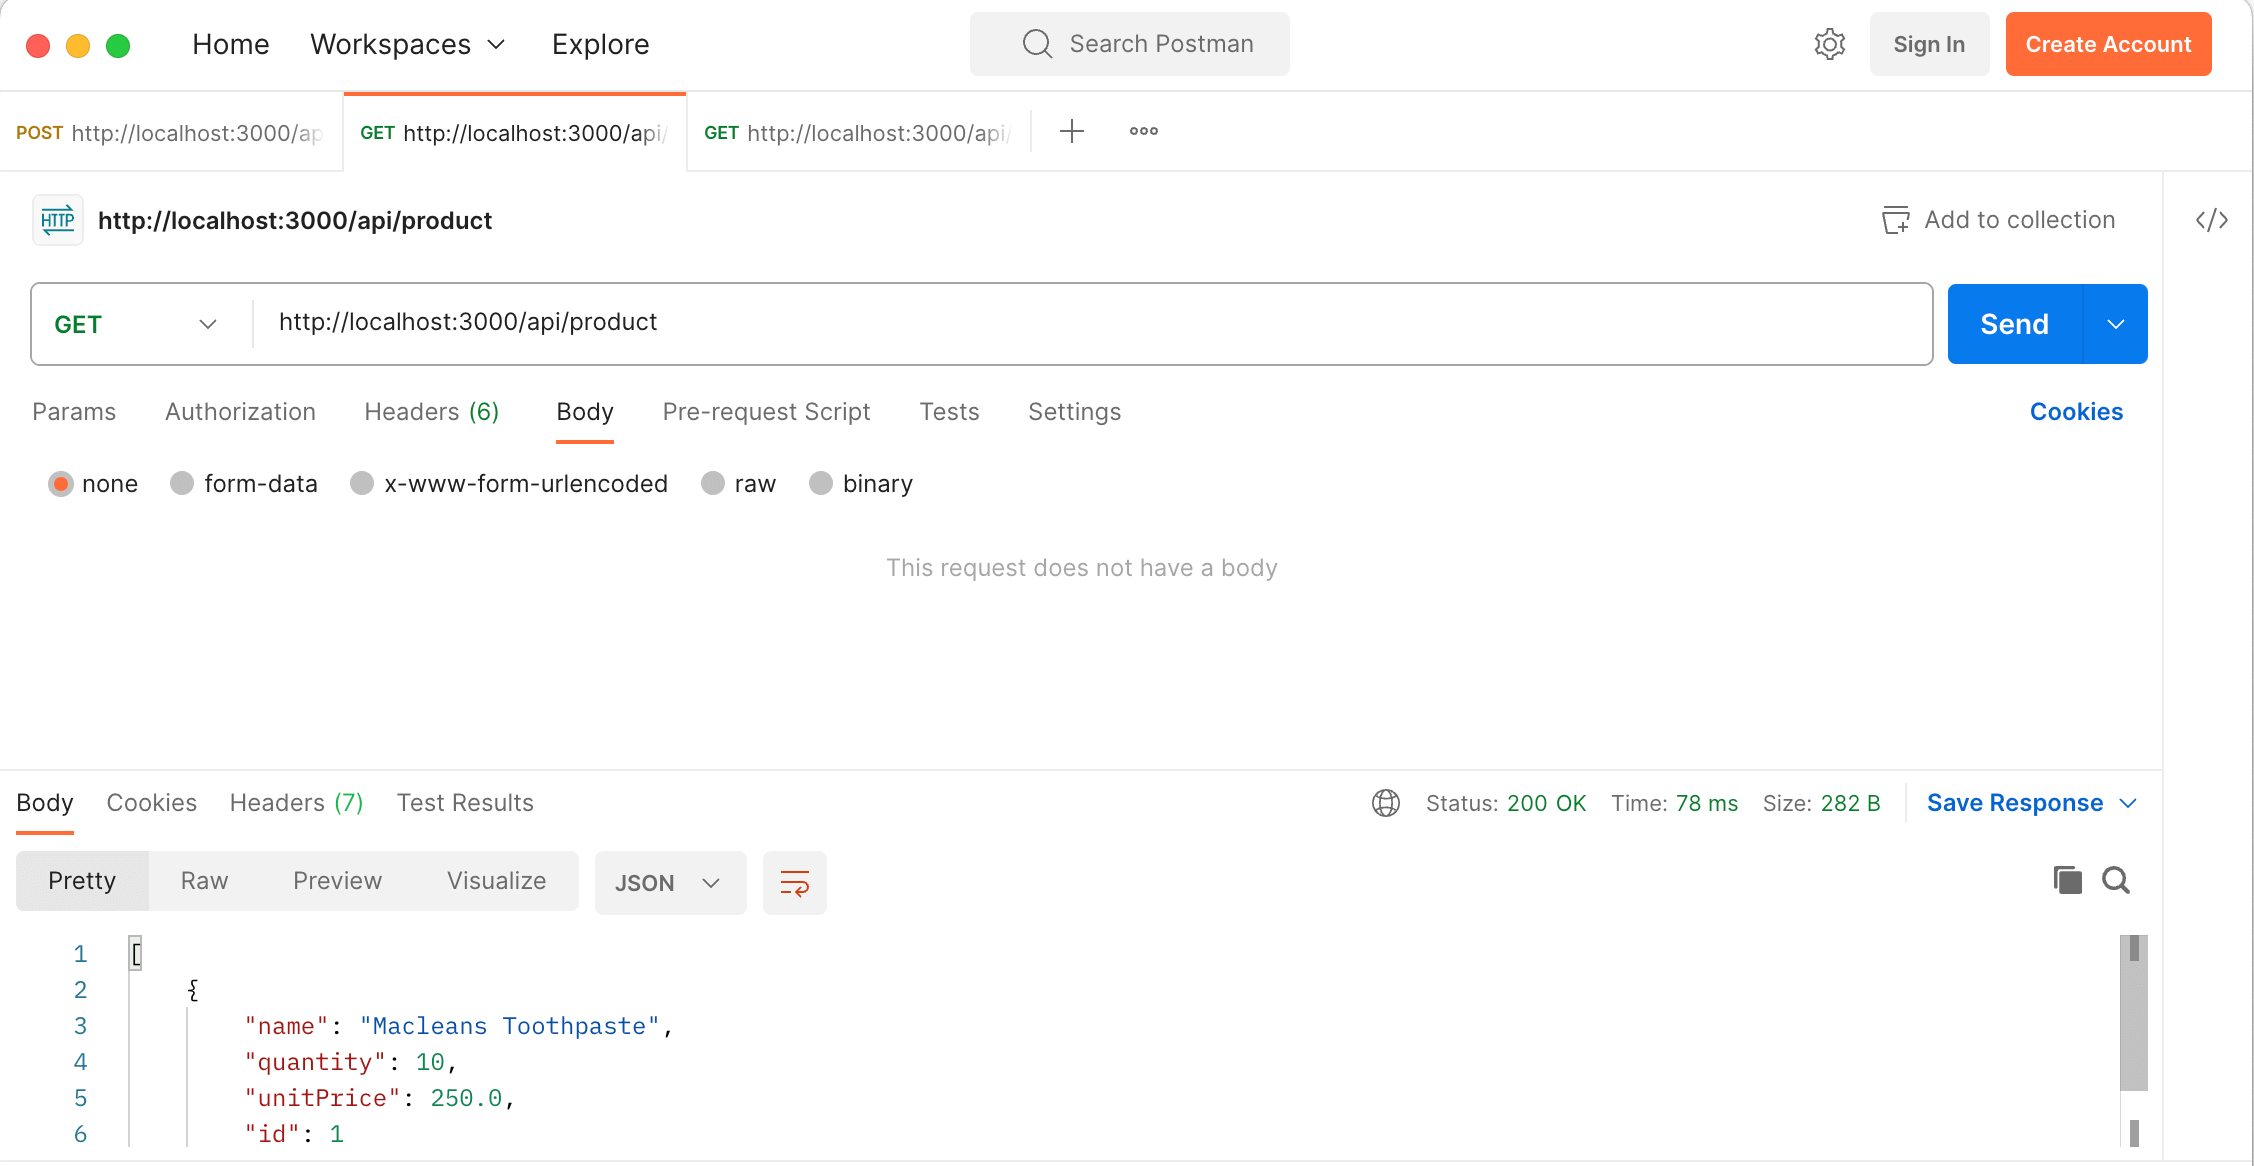
To Fetch all the products that have been added or created, send a GET request to http://localhost:3000/api/product as shown in the image below.

a screenshot of spring boot postman result

To Fetch just one product or a particular product, send a GET request with the specific ID to http://localhost:3000/api/product/1 as shown in the image below.

a screenshot of spring boot postman result

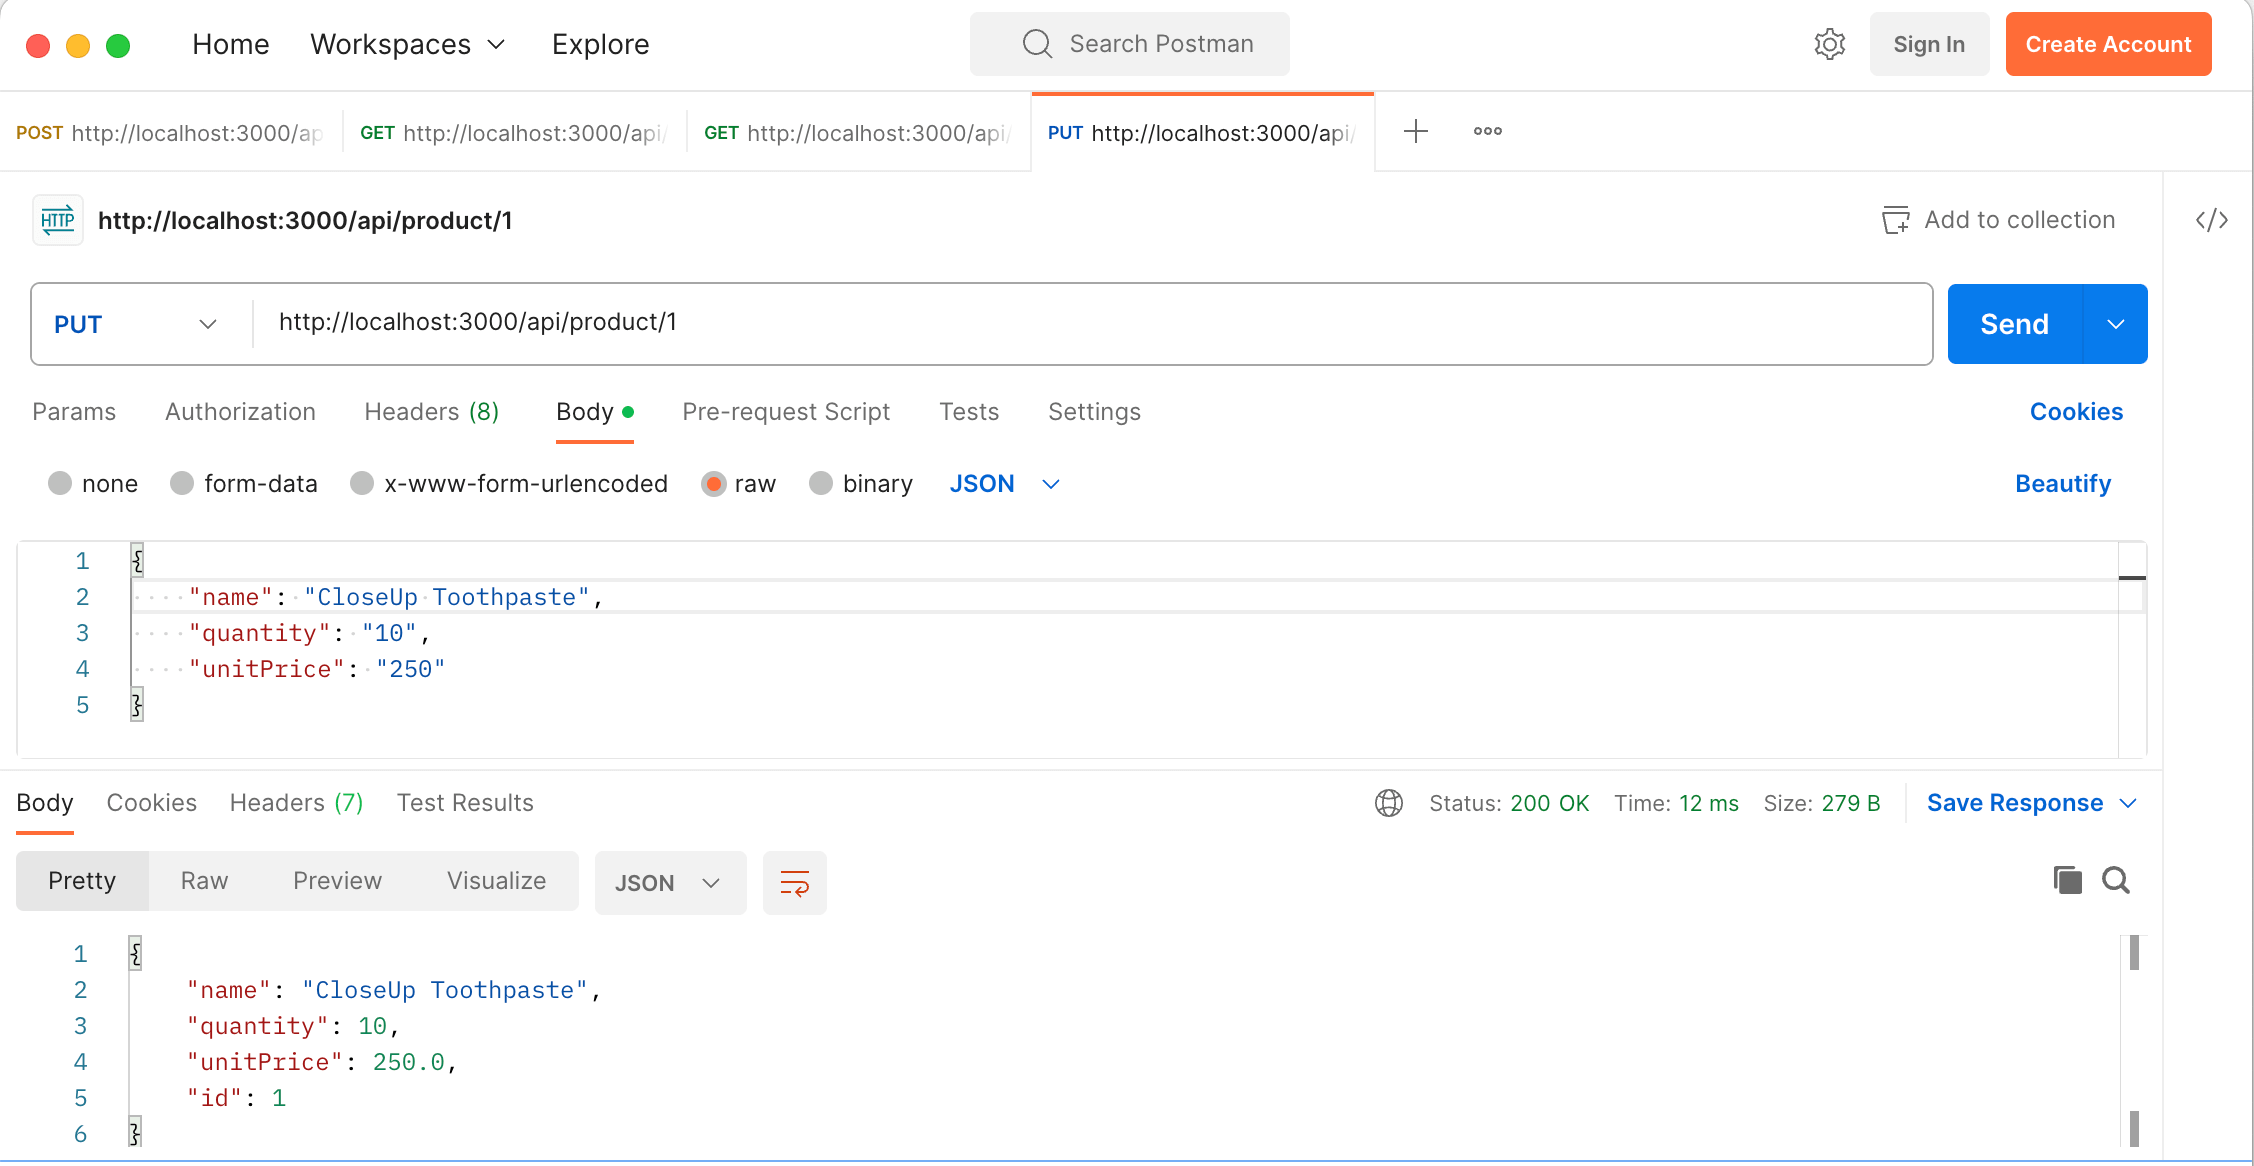
To update any product, send a PUT request with the specific ID to http://localhost:3000/api/product/1 as shown in the image below.

a screenshot of spring boot postman update result

To delete a product, send a DELETE request with the specific ID to http://localhost:3000/api/product/1 as shown in the image below:

a screenshot of spring boot postman delete resultCongratulations, our Spring Boot Web API is working as intended.

Chapter 4: Deploy Spring Boot Application

Here we are going to move a step further and show you how to deploy your project.

Here we are going to move a step further and show you how to deploy your project.

Here is the prerequisite for this chapter

  • A GitHub account

  • Docker

  • Railway Account

First, we need to dockerize the application we’ve built, hence we need to do some modifications.

Open src/main/resources/application.yml and add the following modification to the server section as shown below

server:
    address: ${APP_ADDRESS}
    port: ${APP_PORT}

We’ll be passing the PORT and IP ADDRESS via environment variables on the server, especially the port. If we manually enter the port for our application, there is every tendency that there going to be a port conflict. So it is best our application picks up any random port that is available on production.

Next, create a Dockerfile and add the following

# Build stage
FROM gradle:8.1-jdk AS build
LABEL maintainer="codaholic.com"
WORKDIR /
COPY . /
RUN gradle clean bootJar

# Package stage
FROM amazoncorretto:20-alpine
COPY --from=build /target/libs/*.jar app.jar
EXPOSE 80
ENTRYPOINT ["java","-jar","app.jar"]
  • FROM gradle:8.1-jdk AS build: This line sets the base image for the build stage to gradle:8.1-jdk, which includes the Gradle build tool and Java Development Kit (JDK) version 8.1.

  • LABEL maintainer="codaholic.com": This line sets a label named maintainer with the value "codaholic.com". Labels are used to provide metadata to the Docker image.

  • WORKDIR /: This line sets the working directory within the build container to the root directory (/).

  • COPY . /: This line copies all the files and directories from the current directory (where the Dockerfile is located) to the root directory (/) of the build container.

  • RUN gradle clean bootJar: This line executes the gradle clean bootJar command within the build container. It runs Gradle to clean the project and build an executable JAR using the bootJar task.

The build stage is responsible for building the Java application and generating the executable JAR file.

  • FROM amazoncorretto:20-alpine: This line sets the base image for the packaging stage to amazoncorretto:20-alpine. It is a lightweight distribution of Amazon Corretto, which is an OpenJDK distribution.

  • COPY --from=build /target/libs/*.jar app.jar: This line copies the JAR file generated in the build stage (from the /target/libs/ directory) to the current stage and renames it as app.jar.

  • EXPOSE 80: This line informs Docker that the container will listen on port 80 at runtime. However, this is only a declaration and doesn't actually publish the port to the host machine. You will need to map the container port to a host port when running the Docker container.

  • ENTRYPOINT ["java","-jar","app.jar"]: This line sets the default command to execute when the container starts. It specifies that the java -jar app.jar command should be run, which executes the Java application contained within app.jar.

The packaging stage creates the final Docker image that can be run to deploy and run the Java application.

By now you should have created a GitHub repository and pushed all your code into your GitHub repository.

Next, we need to login into Railway using your GitHub account.

  • Click on New project

  • Click on Empty project

  • Click on Add a Service

  • Click on GitHub Repo

  • Log into GitHub and authorize the Railway app

  • Next Railway the repository to access

Once you follow these steps the app will start building, and get to be deployed.

Click on your app and get to Deploy Logs, you will see this error below

a screenshot of spring boot deploy logsYou will see that after several attempts to restart the application it ended up crashing.

close that screen, click on Variables, next click on Raw Editor as shown below

a screenshot of spring boot deploy variablesEnter the port as shown below:

a screenshot of spring boot deployment env

Here is the trick, setting the environment variable for APP_PORT this way will make Railway pass any available port for our application to use.

Once we are done with the step above, Railway will automatically redeploy our application and this time there will be no error.

a screenshot of spring boot deploymentCongratulation, you have now deployed your spring boot app successfully.

The source code for this tutorial can be found on Codaholic

Chapter 5: Advanced Spring Boot

In the advanced Spring Boot Guide, what you will learn includes:

  • Database Connectivity using X

  • Authentication and Authorization with Spring Boot

  • Real-world Food Ordering App with Spring Boot

  • Write Unit Test with Spring Boot

Let me know in the comments section. I will share it with you.

Don't Stop Learning

Continue reading the Spring Boot Resources for $14.99 only or Get instant access to all current and upcoming courses and content through subscription.

Conclusion: Spring Boot

Spring Boot is a Java framework that is based on the Spring framework used to create scalable and reliable backend APIs.

It is an open-source Java framework designed to simplify the development of Java-based web applications. It is built on top of the popular Spring framework and provides a convention-over-configuration approach, which allows developers to quickly create production-ready applications with little effort.

Now, it’s your turn to practice everything you have learned from this Spring Boot tutorial until you master them by building real-world projects.

Let me know what you will be making. If none, comment “Spring Boot is Great,” and we may connect from there.

This article was originally written by Emmy Steven and edited by the Mastering Backend team

Whenever you're ready

There are 4 ways we can help you become a great backend engineer:

The MB Platform

Join 1000+ backend engineers learning backend engineering. Build real-world backend projects, learn from expert-vetted courses and roadmaps, track your learnings and set schedules, and solve backend engineering tasks, exercises, and challenges.

The MB Academy

The “MB Academy” is a 6-month intensive Advanced Backend Engineering BootCamp to produce great backend engineers.

Join Backend Weekly

If you like post like this, you will absolutely enjoy our exclusive weekly newsletter, Sharing exclusive backend engineering resources to help you become a great Backend Engineer.

Get Backend Jobs

Find over 2,000+ Tailored International Remote Backend Jobs or Reach 50,000+ backend engineers on the #1 Backend Engineering Job Board

Backend Tips, Every week

Backend Tips, Every week