 Spring Boot is a popular Java framework that makes it easy to build and run applications quickly. It provides ready-to-use features so you can focus on writing code instead of setting up everything from scratch. With Spring Boot, you can create web apps, APIs, and services in less time.
Spring AI is a new project that connects the power of artificial intelligence with Spring applications. It gives developers tools to work with AI models easily inside their Java projects. One of the most exciting uses of Spring AI is working with OpenAI, the company behind ChatGPT and other advanced AI models.
OpenAI provides smart models that can understand and generate text, answer questions, and even help write code. By combining Spring Boot, Spring AI, and OpenAI, developers can create powerful apps that think and respond like humans. This makes it possible to build AI-powered chatbots, content tools, or even creative assistants with very little setup.
Step 1: Create a New Spring Boot Project
Go to
Fill details:
Project: Maven
Language: Java
Spring Boot: Latest version
Dependencies: Spring Web
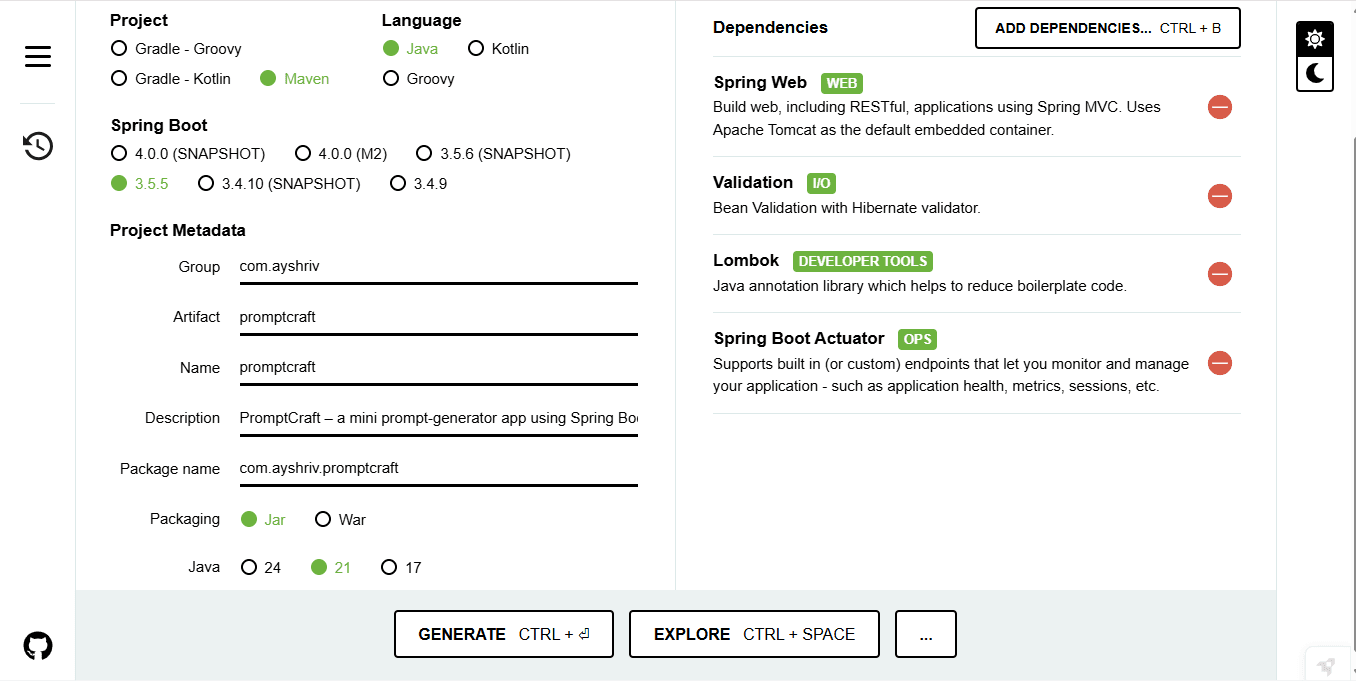 3. Click Generate Project and unzip it.
4. Open the project in IntelliJ IDEA / Eclipse.
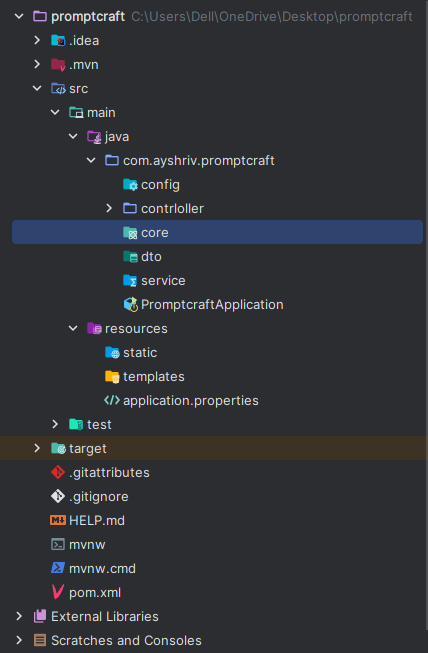
Now you have a simple Spring Boot project ready. and create the project structure like this.
 Step 2: Add Spring AI Dependency
Open your pom.xml and add
<dependency>
    <groupId>org.springframework.ai</groupId>
    <artifactId>spring-ai-openai-spring-boot-starter</artifactId>
    <version>1.0.0</version>
</dependency>
so updated pom.xml looks like this
<?xml version="1.0" encoding="UTF-8"?>
<project xmlns="http://maven.apache.org/POM/4.0.0"  xmlns:xsi="http://www.w3.org/2001/XMLSchema-instance"
         xsi:schemaLocation="http://maven.apache.org/POM/4.0.0
                      https://maven.apache.org/xsd/maven-4.0.0.xsd">
    <modelVersion>4.0.0</modelVersion>

    <parent>
        <groupId>org.springframework.boot</groupId>
        <artifactId>spring-boot-starter-parent</artifactId>
        <version>3.5.5</version>
        <relativePath/>
    </parent>

    <groupId>com.ayshriv</groupId>
    <artifactId>promptcraft</artifactId>
    <version>0.0.1-SNAPSHOT</version>
    <name>promptcraft</name>
    <description>PromptCraft – Mini AI Prompt Generator using Spring Boot + Spring AI (OpenAI only)</description>

    <properties>
        <java.version>21</java.version>
        <spring-ai.version>1.0.0</spring-ai.version>
    </properties>

    <repositories>
        <repository>
            <id>spring-milestones</id>
            <name>Spring Milestones</name>
            <url>https://repo.spring.io/milestone</url>
        </repository>
        <repository>
            <id>spring-snapshots</id>
            <name>Spring Snapshots</name>
            <url>https://repo.spring.io/snapshot</url>
            <snapshots><enabled>true</enabled></snapshots>
        </repository>
    </repositories>

    <dependencies>
        <!-- Spring Boot web stack -->
        <dependency>
            <groupId>org.springframework.boot</groupId>
            <artifactId>spring-boot-starter-web</artifactId>
        </dependency>
        <dependency>
            <groupId>org.springframework.boot</groupId>
            <artifactId>spring-boot-starter-validation</artifactId>
        </dependency>
        <dependency>
            <groupId>org.springframework.boot</groupId>
            <artifactId>spring-boot-starter-actuator</artifactId>
        </dependency>

        <!-- Lombok (optional) -->
        <dependency>
            <groupId>org.projectlombok</groupId>
            <artifactId>lombok</artifactId>
            <optional>true</optional>
        </dependency>

        <dependency>
            <groupId>org.springframework.ai</groupId>
            <artifactId>spring-ai-starter-model-openai</artifactId>
        </dependency>

        <!-- Testing -->
        <dependency>
            <groupId>org.springframework.boot</groupId>
            <artifactId>spring-boot-starter-test</artifactId>
            <scope>test</scope>
        </dependency>
    </dependencies>

    <dependencyManagement>
        <dependencies>
            <dependency>
                <groupId>org.springframework.ai</groupId>
                <artifactId>spring-ai-bom</artifactId>
                <version>${spring-ai.version}</version>
                <type>pom</type>
                <scope>import</scope>
            </dependency>
        </dependencies>
    </dependencyManagement>

    <build>
        <plugins>
            <plugin>
                <groupId>org.apache.maven.plugins</groupId>
                <artifactId>maven-compiler-plugin</artifactId>
                <configuration>
                    <release>${java.version}</release>
                    <annotationProcessorPaths>
                        <path>
                            <groupId>org.projectlombok</groupId>
                            <artifactId>lombok</artifactId>
                        </path>
                    </annotationProcessorPaths>
                </configuration>
            </plugin>
            <plugin>
                <groupId>org.springframework.boot</groupId>
                <artifactId>spring-boot-maven-plugin</artifactId>
            </plugin>
        </plugins>
    </build>
</project>
Step 3: Get an OpenAI API Key
Step 1: Go to the OpenAI Website
Visit https://platform.openai.com in your browser.
Step 2: Sign In or Create an Account
Log in using your existing OpenAI account. If you don’t have one, sign up using your email, Google, or Microsoft account.
Step 3: Open the API Keys Section
Once logged in, click on your profile icon (top-right corner) and select "View API Keys" or go to https://platform.openai.com/account/api-keys directly.
Step 4: Generate a New API Key
Click on the "Create new secret key" button. A new key will be generated.
Step 5: Copy and Save Your Key
Copy the key and store it in a safe place (such as a password manager or .env file). You won’t be able to view it again after closing the popup.
Step 4: Add API Key to application.yml
server:
  port: 8080

spring:
  application:
    name: promptcraft
  ai:
    openai:
      api-key: ${OPENAI_API_KEY}
      chat:
        options:
          model: gpt-4o-mini
          temperature: 0.7
Here we are using gpt-4o-mini.
Never share your API key in your code or upload it to public platforms like GitHub. If someone gets access to your key, they can misuse it, which could lead to unexpected charges or security issues. Instead, store your API key in a safe place, such as environment variables or a secure configuration file. For production applications, it’s recommended to use a secret manager or secure vault service to keep your keys and sensitive information protected.
Step 5: Write Your First AI Controller
package com.ayshriv.promptcraft.contrloller;

import com.ayshriv.promptcraft.core.TemplateStore;
import com.ayshriv.promptcraft.dto.CreateOrUpdateTemplateRequest;
import com.ayshriv.promptcraft.dto.GenerateRequest;
import com.ayshriv.promptcraft.dto.GenerateResponse;
import com.ayshriv.promptcraft.dto.PromptDefinition;
import com.ayshriv.promptcraft.service.PromptCraftService;
import jakarta.validation.Valid;
import lombok.RequiredArgsConstructor;
import org.springframework.http.ResponseEntity;
import org.springframework.web.bind.annotation.*;

import java.net.URI;
import java.util.List;

@RestController
@RequestMapping("/api")
@RequiredArgsConstructor
public class PromptController {
    private final TemplateStore store;
    private final PromptCraftService service;

    @GetMapping("/templates")
    public List<PromptDefinition> list() {
        return store.list();
    }

    @PostMapping("/templates")
    public ResponseEntity<PromptDefinition> upsert(@Valid @RequestBody CreateOrUpdateTemplateRequest req) {
        var def = new PromptDefinition(req.name(), req.description(), req.system(), req.userTemplate());
        store.upsert(def);
        return ResponseEntity.created(URI.create("/api/templates/" + def.name())).body(def);
    }

    @PostMapping("/generate")
    public GenerateResponse generate(@Valid @RequestBody GenerateRequest req) {
        String system = req.system();

        // If existing template name is found, use it; else treat req.template as raw template
        String userTemplate = store.get(req.template())
                .map(PromptDefinition::userTemplate)
                .orElse(req.template());

        if (system == null) {
            system = store.get(req.template()).map(PromptDefinition::system).orElse(null);
        }

        String content = service.generateFromTemplate(system, userTemplate, req.variables(), req.model());
        return new GenerateResponse(content);
    }
}
In This code is a Spring Boot REST controller that manages AI prompt templates and text generation.
/templates(GET) → Lists all saved templates./templates(POST) → Adds or updates a template with name, description, system, and user template./generate(POST) → Uses either a saved template or a raw template string to generate text with given variables and model.
Step 6: Create request and Response DTO’s
package com.ayshriv.promptcraft.dto;

public record PromptDefinition(
        String name,
        String description,
        String system,
        String userTemplate
) {}
In this code defines a record named PromptDefinition that simply holds details of a prompt template:
name → template name
description → short info about the template
system → system instructions
userTemplate → the user prompt pattern
package com.ayshriv.promptcraft.dto;

import jakarta.validation.constraints.NotBlank;

import java.util.Map;

public record GenerateRequest(
        @NotBlank String template,
        Map<String, Object> variables,
        String system,
        String model
) {}
In this code defines a record called GenerateRequest, which is used when asking the app to generate text. It contains:
template → the template name or raw text (must not be blank)
variables → key-value pairs to fill into the template
system → optional system instructions
model → which AI model to use
package com.ayshriv.promptcraft.dto;

public record GenerateResponse(String content) {}
In this code defines a record named GenerateResponse with one field:
content → the generated text output.
package com.ayshriv.promptcraft.dto;

import jakarta.validation.constraints.NotBlank;

public record CreateOrUpdateTemplateRequest(
        @NotBlank String name,
        String description,
        String system,
        @NotBlank String userTemplate
) {}
In this code defines a record called CreateOrUpdateTemplateRequest, used when creating or updating a template. It includes:
name → template name (must not be blank)
description → optional details about the template
system → optional system instructions
userTemplate → the actual template text (must not be blank)
Step 7: Create TemplateStore class of in-memory storage
package com.ayshriv.promptcraft.core;

import com.ayshriv.promptcraft.dto.PromptDefinition;
import jakarta.annotation.PostConstruct;
import org.springframework.stereotype.Component;

import java.util.ArrayList;
import java.util.List;
import java.util.Map;
import java.util.Optional;
import java.util.concurrent.ConcurrentHashMap;

@Component
public class TemplateStore {

    private final Map<String, PromptDefinition> templates = new ConcurrentHashMap<>();

    @PostConstruct
    void seed() {
        templates.put("twitter-hooks", new PromptDefinition(
                "twitter-hooks",
                "Generate 5 short, scroll-stopping hooks",
                "You are a concise, high-conversion copywriter.",
                """
                Generate 5 short hooks for a tweet thread about {topic}.
                Style: {style}. Keep each under 100 characters.
                Output as a numbered list only.
                """
        ));

        templates.put("summarize", new PromptDefinition(
                "summarize",
                "TL;DR in bullet points",
                "You are an expert technical summarizer.",
                """
                Summarize the following content into 5 crisp bullets for {audience}:
                ---
                {content}
                ---
                """
        ));

        templates.put("rewrite-tone", new PromptDefinition(
                "rewrite-tone",
                "Rewrite text in a tone and length",
                "You are a helpful rewriting assistant.",
                """
                Rewrite the text in a {tone} tone and keep it around {words} words.
                Text:
                {text}
                """
        ));
    }

    public List<PromptDefinition> list() {
        return new ArrayList<>(templates.values());
    }

    public Optional<PromptDefinition> get(String name) {
        return Optional.ofNullable(templates.get(name));
    }

    public PromptDefinition upsert(PromptDefinition def) {
        templates.put(def.name(), def);
        return def;
    }
}
TemplateStore is like a small in-memory database for templates, so the app can quickly fetch or update them when generating AI responses.
Step 8: Create PromptCraftServicefor generating prompt with AI.
package com.ayshriv.promptcraft.service;

import org.springframework.stereotype.Service;
import org.springframework.util.StringUtils;

import org.springframework.ai.chat.client.ChatClient;
import org.springframework.ai.chat.prompt.PromptTemplate;
import org.springframework.ai.openai.OpenAiChatOptions;

import java.util.Map;

@Service
public class PromptCraftService {

    private final ChatClient chat;

    public PromptCraftService(ChatClient.Builder chatBuilder) {
        this.chat = chatBuilder.build();
    }


    public String renderTemplate(String rawTemplate, Map<String, Object> vars) {
        PromptTemplate t = new PromptTemplate(rawTemplate);
        return t.render(vars == null ? Map.of() : vars);
    }

    public String generate(String system, String user, String model) {
        if (!StringUtils.hasText(user)) {
            throw new IllegalArgumentException("User message must not be empty");
        }

        var prompt = chat.prompt();

        if (StringUtils.hasText(system)) {
            prompt = prompt.system(system);
        }

        prompt = prompt.user(user);


        if (StringUtils.hasText(model)) {
            return prompt
                    .options(OpenAiChatOptions.builder().model(model).build())
                    .call()
                    .content();
        }

        return prompt.call().content();
    }


    public String generateFromTemplate(String system,
                                       String userTemplate,
                                       Map<String, Object> vars,
                                       String model) {
        String user = renderTemplate(userTemplate, vars);
        return generate(system, user, model);
    }
}
The PromptCraftService class is the core engine that connects with the AI model and generates responses. It uses Spring AI’s ChatClient to send prompts to an AI service like OpenAI. First, it can take a raw template with placeholders and replace them with actual values using the renderTemplate method, producing a user-ready prompt. Then, through the generate method, it builds the final AI request by combining optional system instructions, the user’s message, and an optional model name, before calling the AI and returning the generated content. Finally, the generateFromTemplate method ties everything together by rendering a user template with variables and then sending it along with system instructions to the AI. In short, this service is responsible for turning templates into complete prompts, sending them to the AI, and returning useful responses.
You can download the source code from here:
https://github.com/ayushstwt/PromptCraft.git
Step 9: Testing EndPoints
Create Template
curl --location 'http://localhost:8080/api/templates' \
--header 'Content-Type: application/json' \
--data '{
"name": "motivational-quote",
"description": "Generate motivational quotes about coding",
"system": "You are a helpful assistant that inspires developers.",
"userTemplate": "Write a motivational quote about {{topic}}."
}'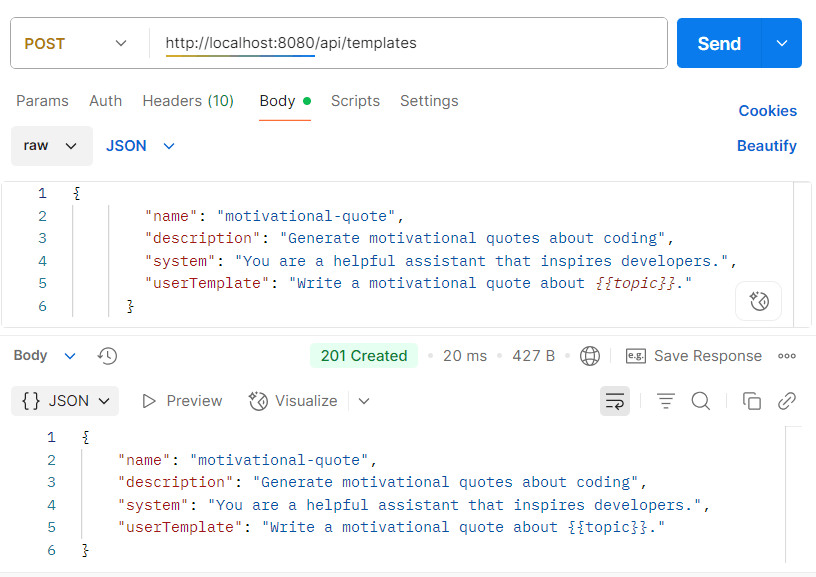 Generate Prompt
curl --location 'http://localhost:8080/api/generate' \
--header 'Content-Type: application/json' \
--data '{
"template": "motivational-quote",
"variables": {
"topic": "Java programming"
},
"model": "gpt-4o-mini"
}'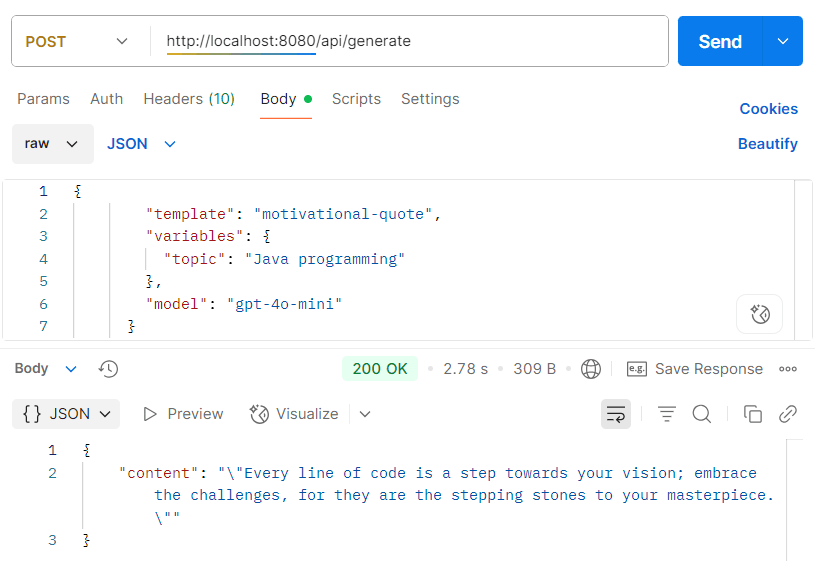 Conclusion
PromptCraft is a lightweight AI-powered prompt generator built with Spring Boot and Spring AI. It allows users to create, store, and reuse templates, making AI interactions more structured and efficient. With its simple REST APIs, developers can quickly generate responses, test different models, and integrate prompt management into their applications.


