 Getting Started with Spring Boot and Spring AI Integration
Spring AI is a new tool from VMware that enables Java developers to easily integrate artificial intelligence (AI) features into their applications. It’s part of the Spring ecosystem and works well with Spring Boot, making it simple to use for anyone familiar with Spring.
With Spring AI, you can connect your app to popular AI services like OpenAI, Hugging Face, or TensorFlow. These services offer powerful tools for things like working with natural language (like chatbots), analyzing images, or making predictions based on data.
What Makes Spring AI Useful?
1. Easy AI Integration:
You can quickly connect to well-known AI platforms without writing a lot of code. Spring AI helps you use ready-made models and APIs from companies like OpenAI and Hugging Face.
2. Works Smoothly with Spring Boot:
Just like other Spring projects, Spring AI fits right into Spring Boot. It supports auto-configuration and helps you get started without dealing with too much setup.
3. Simple Interface:
Spring AI gives you a clean and simple way to call AI models. Even if you’re not an expert in machine learning, you can still use AI features in your app with ease.
4. Flexible and Extensible:
Need to use a different AI tool? No problem. Spring AI is built so you can customize it or add your own service support when needed.
5. Built-in Security and Best Practices:
Since it's part of the Spring family, it follows Spring’s trusted security and coding standards, helping you build safe and scalable applications.
Getting Started with Spring AI
To use Spring AI in your Spring Boot project, you need to follow a few basic steps. Here’s a beginner-friendly guide to help you get started using OpenAI with Spring AI 1.0.0.
Step 1: Go to Spring Initializr
Open your browser and go to https://start.spring.io
Choose the following project settings
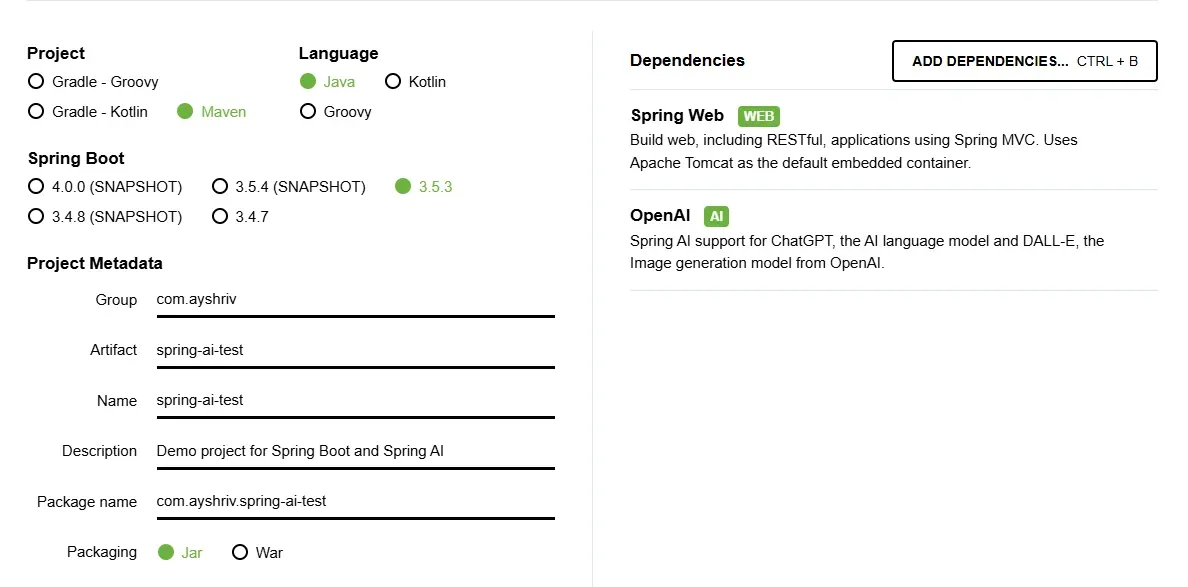 From the Dependencies section, search and add:
Spring Web – for creating REST APIs
Spring AI OpenAI – this might not be listed by default, so we will add it manually in the
pom.xmlfile later
Here's how your full pom.xml might look like
<?xml version="1.0" encoding="UTF-8"?>
<project xmlns="http://maven.apache.org/POM/4.0.0" xmlns:xsi="http://www.w3.org/2001/XMLSchema-instance"
	xsi:schemaLocation="http://maven.apache.org/POM/4.0.0 https://maven.apache.org/xsd/maven-4.0.0.xsd">
	<modelVersion>4.0.0</modelVersion>
	<parent>
		<groupId>org.springframework.boot</groupId>
		<artifactId>spring-boot-starter-parent</artifactId>
		<version>3.5.3</version>
		<relativePath/> <!-- lookup parent from repository -->
	</parent>
	<groupId>com.ayshriv</groupId>
	<artifactId>spring-ai-test</artifactId>
	<version>0.0.1-SNAPSHOT</version>
	<name>spring-ai-test</name>
	<description>Demo project for Spring Boot and Spring AI</description>
	<url/>
	<licenses>
		<license/>
	</licenses>
	<developers>
		<developer/>
	</developers>
	<scm>
		<connection/>
		<developerConnection/>
		<tag/>
		<url/>
	</scm>
	<properties>
		<java.version>24</java.version>
		<spring-ai.version>1.0.0</spring-ai.version>
	</properties>
	<dependencies>
		<dependency>
			<groupId>org.springframework.boot</groupId>
			<artifactId>spring-boot-starter-web</artifactId>
		</dependency>
		<dependency>
			<groupId>org.springframework.ai</groupId>
			<artifactId>spring-ai-starter-model-openai</artifactId>
		</dependency>

		<dependency>
			<groupId>org.springframework.boot</groupId>
			<artifactId>spring-boot-starter-test</artifactId>
			<scope>test</scope>
		</dependency>
	</dependencies>
	<dependencyManagement>
		<dependencies>
			<dependency>
				<groupId>org.springframework.ai</groupId>
				<artifactId>spring-ai-bom</artifactId>
				<version>${spring-ai.version}</version>
				<type>pom</type>
				<scope>import</scope>
			</dependency>
		</dependencies>
	</dependencyManagement>

	<build>
		<plugins>
			<plugin>
				<groupId>org.springframework.boot</groupId>
				<artifactId>spring-boot-maven-plugin</artifactId>
			</plugin>
		</plugins>
	</build>

</project>Step 2: Configure Your OpenAI API Key
spring.ai.openai.api-key=your_openai_api_keyNever share your API key in your code or upload it to public platforms like GitHub. If someone gets access to your key, they can misuse it, which could lead to unexpected charges or security issues. Instead, store your API key in a safe place, such as environment variables or a secure configuration file. For production applications, it’s recommended to use a secret manager or secure vault service to keep your keys and sensitive information protected.
Step 3: Project Structure
src/
├── main/
│   ├── java/
│   │   └── com/
│   │       └── ayshriv/
│   │           └── springaitest/
│   │               ├── SpringAiTestApplication.java       // Main class
│   │               ├── service/
│   │               │   └── AiService.java                 // Service using ChatClient
│   │               └── controller/
│   │                   └── AiController.java              // REST API to send prompt
│   └── resources/
│       └── application.properties                         // Configuration file for API key
Step 4: Create a Service That Uses ChatClient
package com.ayshriv.springaitest.service;

import org.springframework.ai.chat.ChatClient;
import org.springframework.stereotype.Service;

@Service
public class AiService {

    private ChatClient client;

    public AIService(OpenAiChatModel client) {
        this.client = ChatClient.create(client);
    }

    public String ask(String prompt) {
        return client.prompt(prompt)
                .call()
                .content();
    }
}
In the code above, we use OpenAiChatModel, a model implementation provided by Spring AI, to interact with OpenAI’s GPT-based models. Rather than injecting ChatClient directly, we inject an instance of OpenAiChatModel and wrap it using ChatClient.create(...) to obtain a usable ChatClient. This design provides a fluent and flexible API for sending prompts to the AI. The call() method sends the user's input to the model, while the content() method extracts just the text portion of the AI’s response. This makes it easy to use the service within controllers or other application layers that require intelligent, AI-generated answers.
Step 5: Create a REST Controller to Test AI Integration
package com.ayshriv.springaitest.controller;

import com.ayshriv.springaitest.service.AiService;
import org.springframework.web.bind.annotation.*;

@RestController
@RequestMapping("/api/ai")
public class AiController {

    private final AiService aiService;

    public AiController(AiService aiService) {
        this.aiService = aiService;
    }

    @GetMapping
    public String ask(@RequestParam String prompt) {
        return aiService.ask(prompt);
    }
}
Step 6: Run and Test
http://localhost:8080/api/ai?prompt=What is Spring AI?Expected Output
You will get a response from OpenAI (e.g., GPT-4) processed via Spring AI. The actual output will vary depending on the AI model version and its current behavior, but here is an example

As of my last knowledge update in October 2023, Spring AI is not a widely recognized or established term in the field of artificial intelligence. However, it might refer to various concepts or initiatives related to artificial intelligence in the context of the Spring Framework, which is a popular framework for building Java applications. If "Spring AI" refers to a specific project, product, or initiative that has emerged after my last update, I may not have the latest information on it. In that case, I recommend checking the latest resources, news articles, or official documentation related to "Spring AI" for the most accurate and current information. If you provide more context or details about what you mean by "Spring AI," I may be able to help clarify further!You can find the complete source code for this project on GitHub
https://github.com/ayushstwt/spring-ai-openai-starter.git
Feel free to clone the repo, explore the code, and use it as a starter for your own AI-powered Spring Boot applications!
Conclusion
Spring AI makes it super easy to add AI features to your Spring Boot apps. In this guide, you learned how to connect your app to OpenAI and create a simple API that sends questions and gets smart answers. With just a bit of setup, you can now build apps that think and respond — all using tools you already know.