Security is one of the most important parts of any web application. Whether you are building a small blog or a large e-commerce platform, you need to make sure that only authorized people can access the system. Imagine building a house. You may decorate it with beautiful furniture, but if the doors are left unlocked, anyone can enter. The same is true for applications. Without security, your data and users are at risk.
This is where Spring Security comes in. Spring Security is a powerful and flexible framework that helps you add authentication (who are you?) and authorization (what are you allowed to do?) to your Spring Boot applications.
In this article, we will learn the basics of Spring Security in simple words. We will also build a small real-time example where we secure a REST API using username and password. By the end, you will be ready to secure your first Spring Boot application.
Prerequisites
Before we dive in, make sure you are familiar with the following:
Java Basics – You should know how to write simple Java classes and methods.
Spring Boot Basics – Understanding how to create a simple REST API using Spring Boot will help.
Maven or Gradle – You should know how to add dependencies and run a Spring Boot project.
IDE Setup – Install IntelliJ IDEA, Eclipse, or VS Code with Java support.
JDK Installed – Java 17 or above is recommended (though Spring Boot also supports Java 11).
Basic REST Knowledge – Understanding what endpoints are (
/products,/admin) will make the example easier to follow.
If you are completely new to Spring Boot, you may want to quickly build a simple “Hello World” REST API first. That way, adding security will feel natural.
What is Spring Security?
Spring Security is a powerful and highly customizable authentication and access-control framework. It is the de-facto standard for securing Spring-based applications.
Spring Security is a framework that focuses on providing both authentication and authorization to Java applications. Like all Spring projects, the real power of Spring Security is found in how easily it can be extended to meet custom requirements
Spring Security is a framework that provides security services for Java applications. It is part of the Spring ecosystem, just like Spring Boot and Spring Data. The main goals of Spring Security are:
Authentication – Identifying the user. Example: logging in with username and password.
Authorization – Giving permissions. Example: an admin can delete users, but a normal user cannot.
Protection against common attacks – Such as CSRF (Cross-Site Request Forgery), XSS (Cross-Site Scripting), and session fixation.
The best part is that Spring Security is highly customizable. You can use basic login forms, JWT (JSON Web Tokens), OAuth2, or even integrate with external systems like Google or Facebook login.
Why Use Spring Security?
Here are a few reasons why Spring Security is a good choice:
It is the most widely used security framework in the Java world.
It works seamlessly with Spring Boot, so you don’t need to do much setup.
It provides defaults for common security features, but you can customize them as your application grows.
It is trusted by companies across the world for production-ready applications.
Getting Started with a Simple Example
Let’s build a small Spring Boot application that provides APIs for a product store. We will then secure the APIs so that only authorized users can access them.
Step 1: Create a Spring Boot Project
Go to Spring Initializr and create a project with
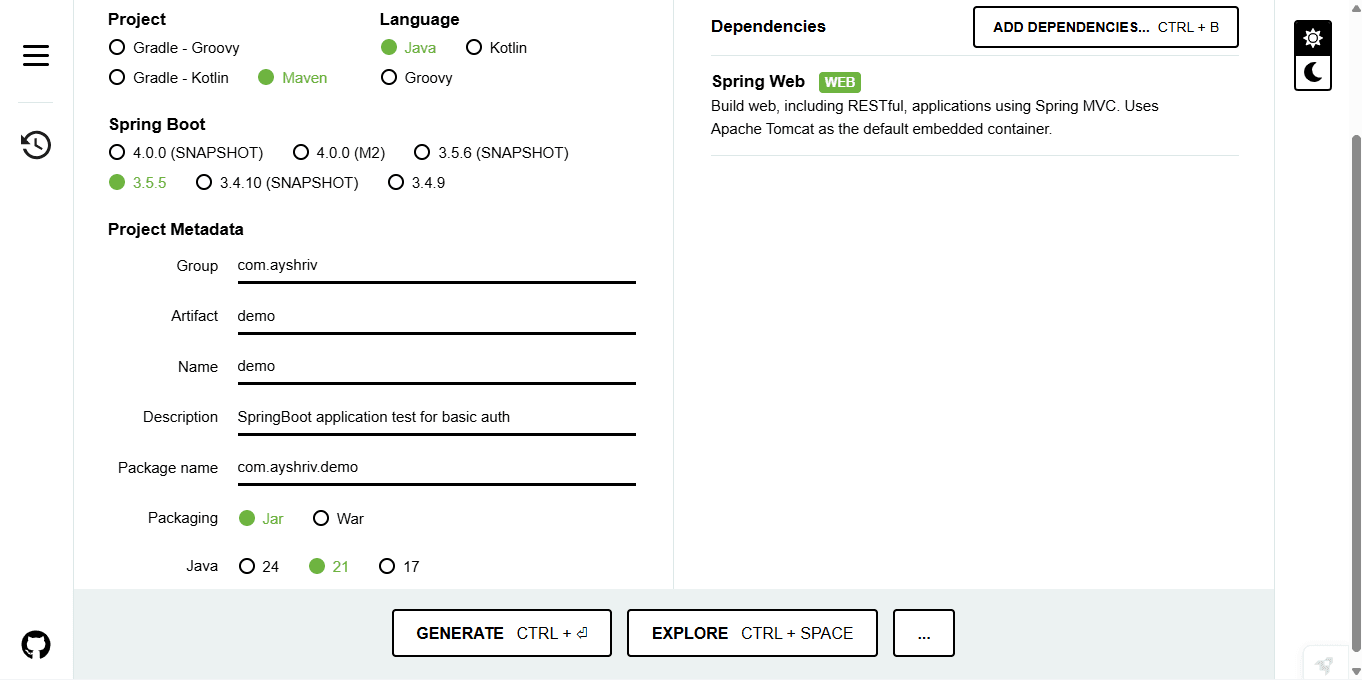
Spring Boot version: latest stable
Dependencies:
Spring Web
Spring Security (Latter)
Download the project and open it in your favorite IDE.
Step 2: Write a Simple REST Controller
Create a controller called ProductController:
package com.example.demo.controller;

import org.springframework.web.bind.annotation.GetMapping;
import org.springframework.web.bind.annotation.RestController;
import java.util.List;

@RestController
public class ProductController {

    @GetMapping("/products")
    public List<String> getProducts() {
        return List.of("Laptop", "Mobile", "Tablet");
    }

    @GetMapping("/admin")
    public String adminOnly() {
        return "Welcome Admin! You have full access.";
    }
}
Here, we have two endpoints:
/products→ returns a list of products (should be available to all users)./admin→ only admin users should be able to see this.
Step 3: Run Without Security
If you run the application now, you can open the browser and go to:
http://localhost:8080/products→ You will see the product list.http://localhost:8080/admin→ You will see the admin message.
Right now, everything is open to the world. That is risky. Let’s add security.
Step 4: Add Spring Security
When you add the Spring Security dependency, by default, it will secure all endpoints with basic authentication.
<dependency>
      <groupId>org.springframework.boot</groupId>
      <artifactId>spring-boot-starter-security</artifactId>
</dependency>
Now updated pom.xml
<?xml version="1.0" encoding="UTF-8"?>
<project xmlns="http://maven.apache.org/POM/4.0.0" xmlns:xsi="http://www.w3.org/2001/XMLSchema-instance"
	xsi:schemaLocation="http://maven.apache.org/POM/4.0.0 https://maven.apache.org/xsd/maven-4.0.0.xsd">
	<modelVersion>4.0.0</modelVersion>
	<parent>
		<groupId>org.springframework.boot</groupId>
		<artifactId>spring-boot-starter-parent</artifactId>
		<version>3.5.5</version>
		<relativePath/> <!-- lookup parent from repository -->
	</parent>
	<groupId>com.ayshriv</groupId>
	<artifactId>demo</artifactId>
	<version>0.0.1-SNAPSHOT</version>
	<name>demo</name>
	<description>SpringBoot application test for basic auth</description>
	<url/>
	<licenses>
		<license/>
	</licenses>
	<developers>
		<developer/>
	</developers>
	<scm>
		<connection/>
		<developerConnection/>
		<tag/>
		<url/>
	</scm>
	<properties>
		<java.version>21</java.version>
	</properties>
	<dependencies>
		<dependency>
			<groupId>org.springframework.boot</groupId>
			<artifactId>spring-boot-starter-security</artifactId>
		</dependency>
		<dependency>
			<groupId>org.springframework.boot</groupId>
			<artifactId>spring-boot-starter-web</artifactId>
		</dependency>

		<dependency>
			<groupId>org.springframework.boot</groupId>
			<artifactId>spring-boot-starter-test</artifactId>
			<scope>test</scope>
		</dependency>
		<dependency>
			<groupId>org.springframework.security</groupId>
			<artifactId>spring-security-test</artifactId>
			<scope>test</scope>
		</dependency>
	</dependencies>

	<build>
		<plugins>
			<plugin>
				<groupId>org.springframework.boot</groupId>
				<artifactId>spring-boot-maven-plugin</artifactId>
			</plugin>
		</plugins>
	</build>

</project>
Run the application again. Now, if you try to access /products, you will see a login popup in the browser.
Spring Security automatically creates a default user with:
Username:
userPassword: shown in the console logs when the app starts.
This is a good start, but we want to define our own users.
Step 5: Configure Users and Roles
Create a new configuration class:
package com.ayshriv.demo.config;

import org.springframework.context.annotation.Bean;
import org.springframework.context.annotation.Configuration;
import org.springframework.security.config.Customizer;
import org.springframework.security.config.annotation.web.builders.HttpSecurity;
import org.springframework.security.core.userdetails.User;
import org.springframework.security.core.userdetails.UserDetails;
import org.springframework.security.core.userdetails.UserDetailsService;
import org.springframework.security.provisioning.InMemoryUserDetailsManager;
import org.springframework.security.web.SecurityFilterChain;

@Configuration
public class SecurityConfig {

    // Define users
    @Bean
    public UserDetailsService userDetailsService() {
        UserDetails user = User.withDefaultPasswordEncoder()
                .username("john")
                .password("password123")
                .roles("USER")
                .build();

        UserDetails admin = User.withDefaultPasswordEncoder()
                .username("admin")
                .password("admin123")
                .roles("ADMIN")
                .build();

        return new InMemoryUserDetailsManager(user, admin);
    }

    // Define security rules
    @Bean
    public SecurityFilterChain filterChain(HttpSecurity http) throws Exception {
        http
            .authorizeHttpRequests(auth -> auth
                .requestMatchers("/admin").hasRole("ADMIN")
                .requestMatchers("/products").hasAnyRole("USER", "ADMIN")
                .anyRequest().authenticated()
            )
            .httpBasic(Customizer.withDefaults());

        return http.build();
    }
}
What did we do here?
UserDetailsService – We created two users:
john / password123 → Role USER
admin / admin123 → Role ADMIN
SecurityFilterChain – We told Spring Security:
/admincan only be accessed by ADMIN./productscan be accessed by USER or ADMIN.Any other request must be authenticated.
We used HTTP Basic Authentication, which means username and password will be sent with each request.
Step 6: Test the Security
Now restart the app and test:
Visit
http://localhost:8080/productsEnter username
johnand passwordpassword123→ You will see the product list.Enter username
adminand passwordadmin123→ You will also see the product list.
Visit
http://localhost:8080/adminEnter
john / password123→ Access denied.Enter
admin / admin123→ Success, you see "Welcome Admin".
Now our APIs are secure.
In this test when you open http://localhost:8080/products and log in with john/password123 or admin/admin123, both users can see the product list. But if you go to http://localhost:8080/admin, the user john/password123 will get “Access Denied” because he is not an admin. Only the user admin/admin123 can log in there and will see the message “Welcome Admin”.
This shows that our APIs are now secure normal users can only see products, and only the admin has access to the admin page.


