
In modern web development, securing applications while providing smooth user experiences is crucial. One way to achieve both is by using OAuth 2.0, a powerful protocol that not only secures your APIs but also simplifies user authentication by allowing users to log in with their existing accounts, like those from Google and GitHub. This streamlines the login process: users don’t need to remember another password, and developers get a reliable, secure way to manage authentication.
In this guide, I’ll walk you through setting up OAuth 2.0 authentication in a Spring Boot application. We’ll integrate both Google and GitHub for authentication, giving users a choice of login services. I’ll also show you how to protect your API endpoints using JWT (JSON Web Tokens), ensuring that only authenticated users can access your resources.
Whether you’re building a new app or enhancing the security of an existing one, this guide will equip you with the tools to make your Spring Boot application secure and user-friendly.
Getting Started
Visit start.spring.io to create your Spring Boot project.
 Dependencies
To integrate OAuth 2.0 authentication with Google and GitHub, your Spring Boot project will need the following two key dependencies:
OAuth2 Client: This dependency in simplifies the integration of OAuth 2.0 authentication with providers like Google and GitHub. It automates the entire OAuth login process, from redirecting users to the provider's login page to managing authentication tokens and securing API endpoints. By adding this dependency, you can quickly enable a secure and user-friendly authentication system in your Spring Boot application.
Spring Web: This dependency is essential for developing web applications with Spring Boot. It includes critical features such as RESTful API creation, support for the MVC architecture, and the ability to serve HTML views. With Spring Web, you can effectively handle HTTP requests, manage routing, and integrate seamlessly with other Spring components, making it a cornerstone for building robust web applications.
Application Configuration
To set up your Spring Boot application for OAuth 2.0 authentication with Google and GitHub, you'll need to configure the application.properties file. This file contains essential settings for your application, including OAuth client credentials, logging levels, and JWT configurations.
spring.application.name=oauth2-authentication-service
server.port=8000

#for google
spring.security.oauth2.client.registration.google.client-id=YOUR_GOOGLE_CLIENT_ID
spring.security.oauth2.client.registration.google.client-secret=YOUR_GOOGLE_CLIENT_SECRET

#for github
spring.security.oauth2.client.registration.github.client-id=YOUR_GITHUB_CLIENT_ID
spring.security.oauth2.client.registration.github.client-secret= YOUR_GITHUB_CLIENT_SECRET
OAuth Client Configurations: Replace YOUR_GOOGLE_CLIENT_ID, YOUR_GOOGLE_CLIENT_SECRET, YOUR_GITHUB_CLIENT_ID, and YOUR_GITHUB_CLIENT_SECRET with the credentials you obtain from Google and GitHub when you register your application.
To register your application with Google and GitHub for OAuth 2.0 authentication, we need to go https://console.cloud.google.com
 Click on API Services
 Credentials -> create Credentials -> OAuth client ID
 OAuth client ID -> Create OAuth client ID
 Select Application type to web Application
 Write the name of application
 Set Authorized redirect URIs with this URL and here our application is running on 8000 port so application port is 8000. then click on create
http://localhost:8000/login/oauth2/code/google Once the OAuth client is created, you will receive the Client ID and Client Secret.
 Copy both the Client ID and Client Secret, and replace the corresponding values in the application.properties file.
spring.security.oauth2.client.registration.google.client-id=YOUR_GOOGLE_CLIENT_ID
spring.security.oauth2.client.registration.google.client-secret=YOUR_GOOGLE_CLIENT_SECRET
The SecurityConfig class configures security for a Spring Boot application using OAuth2. It defines a SecurityFilterChain bean, which sets up security rules. The authorizeHttpRequests method ensures that all incoming requests require authentication.
The .oauth2Login(Customizer.withDefaults()) line enables OAuth2 login functionality with default settings. Finally, the securityFilterChain method returns the configured security filter chain by calling http.build(). This setup ensures that the application is secure and supports OAuth2 authentication for users.
Accessing Your Application via Chrome
When developing and testing your Spring Boot application, it's crucial to know how to interact with it through Postman. If your application is running locally on port 8000, you can access it using the following base URL:
http://localhost:8000 We get the similar response like this
 Now we can access the end points.
GitHub Authentication
GitHub Authentication in Spring Boot enables users to log in using their GitHub accounts, streamlining the authentication process and enhancing security. By integrating GitHub as an OAuth 2.0 provider, your application can authenticate users through GitHub's trusted platform. This involves registering your application on GitHub to obtain a Client ID and Client Secret, which are then configured in your Spring Boot application. Users are redirected to GitHub for login, and upon successful authentication, they are redirected back to your application with an access token, allowing secure access to your protected resources. This integration is ideal for applications targeting developers and tech-savvy users.
Create GitHub account and go to settings
 In the left corner, get the developer settings
 Navigate to OAuth Apps
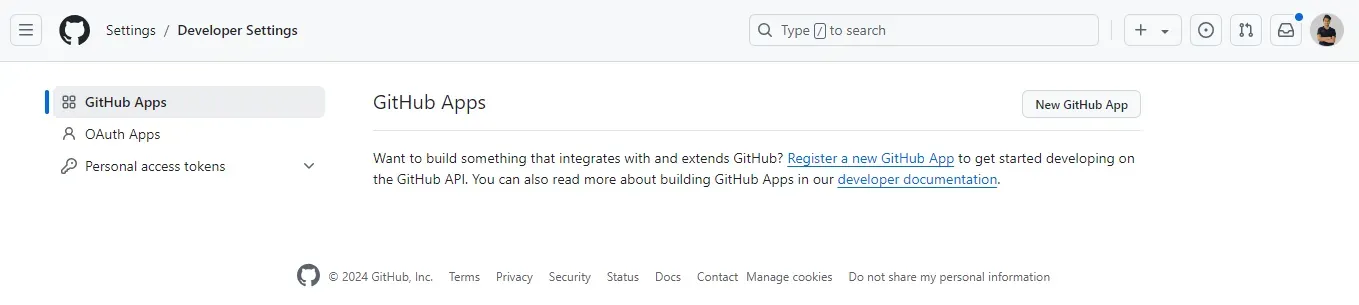 Click on create OAuth App
 You’ll get an interface like this
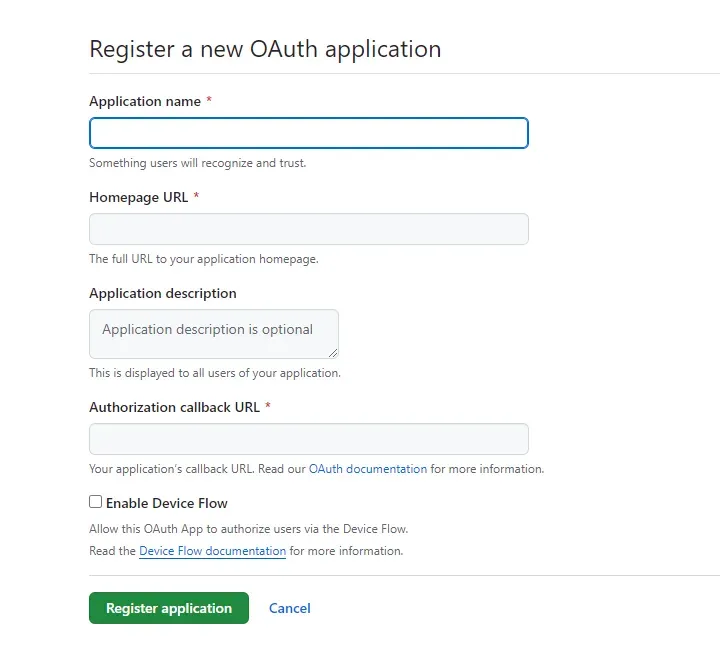 Set Authorization callback URL according to your application port
http://localhost:8000/login/oauth2/code/github Set Homepage URL
<http://localhost:8000>After registering the Application we get the Client ID and Client Secret
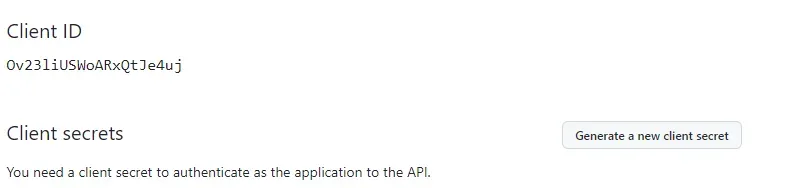 Now replace with the Application.properties file properties
spring.security.oauth2.client.registration.github.client-id=Ov23liBMLc5e1ItoONPx
spring.security.oauth2.client.registration.github.client-secret=
Test the GitHub Login
Login with GitHub: When prompted, log in with your GitHub credentials. Success Redirect: Upon successful authentication, you'll be redirected to the /home page of your application.
 You can explore the complete source code for the User Authentication Service on my GitHub repository. This project showcases various features such as user registration, login, and secure access using JWT for authentication. Feel free to check it out, contribute, or use it as a reference for your own projects!
https://github.com/ishrivasayush/oauth2-authentication-service
Conclusion
Implementing OAuth 2.0 with Spring Boot, using Google and GitHub as authentication providers, is a powerful way to enhance the security and usability of your application. By allowing users to log in with their existing accounts, you reduce friction and provide a smoother user experience. At the same time, securing your API endpoints with JWT ensures that only authenticated users have access to sensitive resources.
Through this guide, we’ve covered everything from setting up OAuth credentials on Google and GitHub to configuring your Spring Boot application to handle authentication and protect your endpoints. Whether you’re new to OAuth 2.0 or looking to integrate it into your projects, these steps will help you build a secure and scalable authentication system.


