Writing SQL queries can sometimes feel tricky, especially for people who are not very familiar with databases. For example, if someone wants to find “all users who joined after 2022,” they first need to know the right SQL syntax. Wouldn’t it be easier if they could just type the question in plain English and get the SQL query instantly?
That’s exactly what we are going to build in this article. Using Java, Spring Boot, and OpenAI, we’ll create a small application that works like an AI SQL Translator. You type a normal question, and the app gives you the SQL query that matches it.
To make this possible, we’ll use Spring AI, a new library that makes it simple for Java developers to add AI features to their applications. It connects easily with services like OpenAI and works smoothly with Spring Boot. This means we don’t need to worry about complex AI code—the library handles most of it for us.
By the end of this tutorial, you’ll have a working project where plain English questions are turned into SQL queries. Let’s get started and see how AI can make working with databases much easier.
Getting Started with Spring AI
To use Spring AI in your Spring Boot project, you need to follow a few basic steps. Here’s a beginner-friendly guide to help you get started using OpenAI with Spring AI 1.0.0.
Step 1: Go to Spring Initializr
Open your browser and go to https://start.spring.io
Project: Maven
Language: Java 21
Spring Boot: 3.5.x
Group:
ayshrivArtifact:
sqltranslatorName:
sqltranslator
Choose the following project settings
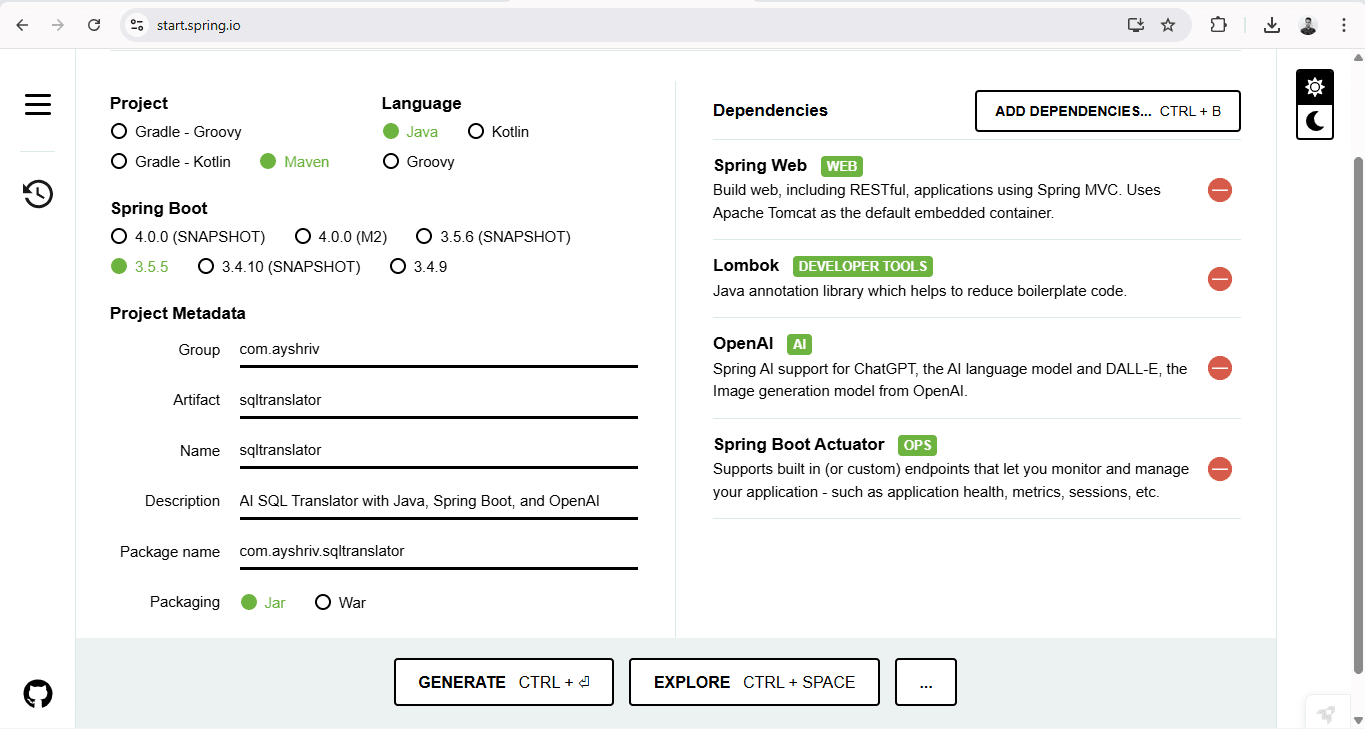 From the Dependencies section, search and add:
Spring Web – for creating REST APIs
Spring AI OpenAI – this might not be listed by default, so we will add it manually in the
pom.xmlfile later(Optional) H2 Database
Here's how your full pom.xml might look like
<?xml version="1.0" encoding="UTF-8"?>
<project xmlns="http://maven.apache.org/POM/4.0.0"  xmlns:xsi="http://www.w3.org/2001/XMLSchema-instance"
         xsi:schemaLocation="http://maven.apache.org/POM/4.0.0
                      https://maven.apache.org/xsd/maven-4.0.0.xsd">
    <modelVersion>4.0.0</modelVersion>

    <parent>
        <groupId>org.springframework.boot</groupId>
        <artifactId>spring-boot-starter-parent</artifactId>
        <version>3.5.5</version>
        <relativePath/>
    </parent>

    <groupId>com.ayshriv</groupId>
    <artifactId>SqlTranslator</artifactId>
    <version>0.0.1-SNAPSHOT</version>
    <name>SqlTranslator</name>
    <description>AI SQL Translator with Java, Spring Boot, and OpenAI</description>

    <properties>
        <java.version>21</java.version>
        <spring-ai.version>1.0.0</spring-ai.version>
    </properties>

    <repositories>
        <repository>
            <id>spring-milestones</id>
            <name>Spring Milestones</name>
            <url>https://repo.spring.io/milestone</url>
        </repository>
        <repository>
            <id>spring-snapshots</id>
            <name>Spring Snapshots</name>
            <url>https://repo.spring.io/snapshot</url>
            <snapshots><enabled>true</enabled></snapshots>
        </repository>
    </repositories>

    <dependencies>
        <!-- Spring Boot web stack -->
        <dependency>
            <groupId>org.springframework.boot</groupId>
            <artifactId>spring-boot-starter-web</artifactId>
        </dependency>
        <dependency>
            <groupId>org.springframework.boot</groupId>
            <artifactId>spring-boot-starter-validation</artifactId>
        </dependency>
        <dependency>
            <groupId>org.springframework.boot</groupId>
            <artifactId>spring-boot-starter-actuator</artifactId>
        </dependency>

        <!-- Lombok (optional) -->
        <dependency>
            <groupId>org.projectlombok</groupId>
            <artifactId>lombok</artifactId>
            <optional>true</optional>
        </dependency>

        <dependency>
            <groupId>org.springframework.ai</groupId>
            <artifactId>spring-ai-starter-model-openai</artifactId>
        </dependency>
        <dependency>
        <groupId>com.h2database</groupId>
        <artifactId>h2</artifactId>
        <scope>runtime</scope>
		    </dependency>

        <!-- Testing -->
        <dependency>
            <groupId>org.springframework.boot</groupId>
            <artifactId>spring-boot-starter-test</artifactId>
            <scope>test</scope>
        </dependency>
    </dependencies>

    <dependencyManagement>
        <dependencies>
            <dependency>
                <groupId>org.springframework.ai</groupId>
                <artifactId>spring-ai-bom</artifactId>
                <version>${spring-ai.version}</version>
                <type>pom</type>
                <scope>import</scope>
            </dependency>
        </dependencies>
    </dependencyManagement>

    <build>
        <plugins>
            <plugin>
                <groupId>org.apache.maven.plugins</groupId>
                <artifactId>maven-compiler-plugin</artifactId>
                <configuration>
                    <release>${java.version}</release>
                    <annotationProcessorPaths>
                        <path>
                            <groupId>org.projectlombok</groupId>
                            <artifactId>lombok</artifactId>
                        </path>
                    </annotationProcessorPaths>
                </configuration>
            </plugin>
            <plugin>
                <groupId>org.springframework.boot</groupId>
                <artifactId>spring-boot-maven-plugin</artifactId>
            </plugin>
        </plugins>
    </build>
</project>
How to generate OpenAI key ?
Step 1: Go to the OpenAI Website
Visit https://platform.openai.com in your browser.
Step 2: Sign In or Create an Account
Log in using your existing OpenAI account. If you don’t have one, sign up using your email, Google, or Microsoft account.
Step 3: Open the API Keys Section
Once logged in, click on your profile icon (top-right corner) and select "View API Keys" or go to https://platform.openai.com/account/api-keys directly.
Step 4: Generate a New API Key
Click on the "Create new secret key" button. A new key will be generated.
Step 5: Copy and Save Your Key
Copy the key and store it in a safe place (such as a password manager or .env file). You won’t be able to view it again after closing the popup.
Step 2: Configure Your OpenAI API Key
spring:
  ai:
    openai:
      api-key: YOUR_OPENAI_API_KEY
      chat:
        options:
          model: gpt-4o-mini
server:
  port: 8080
Never share your API key in your code or upload it to public platforms like GitHub. If someone gets access to your key, they can misuse it, which could lead to unexpected charges or security issues. Instead, store your API key in a safe place, such as environment variables or a secure configuration file. For production applications, it’s recommended to use a secret manager or secure vault service to keep your keys and sensitive information protected.
Step 3: Project Structure
sqltranslator/
│── pom.xml
│── src
│   ├── main
│   │   ├── java
│   │   │   └── ayshriv
│   │   │       └── sqltranslator
│   │   │           ├── SqltranslatorApplication.java   # Main entry point
│   │   │           │
│   │   │           ├── controller
│   │   │           │   └── SqlController.java          # REST API layer
│   │   │           │
│   │   │           ├── dto
│   │   │           │   └── SqlRequest.java             # Request DTO
│   │   │           │
│   │   │           └── service
│   │   │               └── SqlAiService.java           # AI logic with Spring AI
│   │   │
│   │   └── resources
│   │       ├── application.yml                         # Spring config (API Key, etc.)
│   │       └── static/                                 # (Optional) Frontend files
│   │
│   └── test
│       └── java
│           └── ayshriv
│               └── sqltranslator
│                   └── SqltranslatorApplicationTests.java  # Unit tests
Step 4: Create DTO’s
package ayshriv.sqltranslator.dto;

public class SqlRequest {
    private String question;

    public String getQuestion() {
        return question;
    }
    public void setQuestion(String question) {
        this.question = question;
    }
}
In this code defines a simple Java class called SqlRequest that is used to carry data, usually from the user to the server. It has one private field called question which stores the user’s input, like a natural language question. To keep the field safe and follow best practices, the class provides a getter method getQuestion() to read the value and a setter method setQuestion() to update the value. This kind of class is often called a DTO (Data Transfer Object) and is commonly used in Spring Boot projects when receiving or sending data in APIs.
Step 5: Create Service Layer
package ayshriv.sqltranslator.service;

import org.springframework.ai.chat.client.ChatClient;
import org.springframework.ai.chat.prompt.PromptTemplate;
import org.springframework.stereotype.Service;

import java.util.Map;

@Service
public class SqlAiService {

    private final ChatClient chatClient;

    public SqlAiService(ChatClient.Builder builder) {
        this.chatClient = builder.build();
    }

    public String generateSql(String question) {
        String template = """
                You are an SQL expert.
                Convert the following natural language question into a valid SQL query.
                Question: {question}
                SQL:
                """;

        PromptTemplate prompt = new PromptTemplate(template, Map.of("question", question));

        return chatClient.prompt(prompt)
                .call()
                .content();
    }
}
In this code defines a Spring Boot service class called SqlAiService that uses Spring AI to turn natural language questions into SQL queries. It is marked with @Service, meaning it is a service layer component in the application. Inside the class, a ChatClient is used to communicate with the AI model. The constructor takes a ChatClient.Builder and builds the client for use. The main method generateSql(String question) creates a text template that tells the AI: “You are an SQL expert. Convert the question into a valid SQL query.” It then uses a PromptTemplate to replace {question} with the actual user input. Finally, it sends this prompt to the AI using the chatClient, gets the response, and returns the SQL query as a string. In short, this service takes a natural language question from the user and produces the corresponding SQL query using AI.
Step 6: Create REST Controller
package ayshriv.sqltranslator.controller;

import ayshriv.sqltranslator.dto.SqlRequest;
import ayshriv.sqltranslator.service.SqlAiService;
import org.springframework.web.bind.annotation.*;

@RestController
@RequestMapping("/api/sql")
public class SqlController {

    private final SqlAiService sqlAiService;

    public SqlController(SqlAiService sqlAiService) {
        this.sqlAiService = sqlAiService;
    }

    @PostMapping("/generate")
    public String generateSql(@RequestBody SqlRequest request) {
        return sqlAiService.generateSql(request.getQuestion());
    }
}
In this code defines a Spring Boot REST controller named SqlController that handles API requests for generating SQL queries. It is marked with @RestController, meaning it can receive HTTP requests and return responses, and all its routes start with /api/sql because of @RequestMapping. Inside the class, it uses SqlAiService to perform the actual SQL generation. The controller has one endpoint, /generate, which listens for POST requests. When a request comes in with a JSON body containing a question (wrapped in the SqlRequest DTO), the method generateSql() calls the service’s generateSql() method, passes the question to it, and returns the generated SQL query as the response. In short, this controller is the entry point for clients to send natural language questions and get back SQL queries.
Step 7: Testing
cURL Example 1 – Simple Query
curl -X POST http://localhost:8080/api/sql/generate \
  -H "Content-Type: application/json" \
  -d '{"question":"Get all users older than 25"}'
Response
SELECT * FROM users WHERE age > 25;cURL Example 2 – Another Query
curl -X POST http://localhost:8080/api/sql/generate \
  -H "Content-Type: application/json" \
  -d '{"question":"Find all employees who joined after 2022"}'
Response
SELECT * FROM employees WHERE join_date > '2022-12-31';cURL Example 3 – Aggregation Query
curl -X POST http://localhost:8080/api/sql/generate \
  -H "Content-Type: application/json" \
  -d '{"question":"Show the average salary of employees in each department"}'
Response
SELECT department, AVG(salary)
FROM employees
GROUP BY department;
Conclusion
We built a simple AI SQL Translator using Java, Spring Boot, and OpenAI. It takes plain English questions and turns them into SQL queries. This project is a starting point—you can extend it to run queries on real databases, add schema awareness, or build a UI. With Spring AI, adding AI features to Java apps becomes simple and powerful.